Creating Different Kinds of Internal Lattice Structure: A Complete Tutorial
In this article, we are going to design a scientific and accurate kind of lattice structure for a cube or other geometrical 3D shapes using Blender. The difference between a scientific and an aesthetic lattice structure is that in a scientific lattice structure we need accurate dimensions as opposed to aesthetic lattice structures where beauty is the priority. We use different methods for modeling the 2 kinds of lattice structures.
An introduction to Internal Lattice Structure
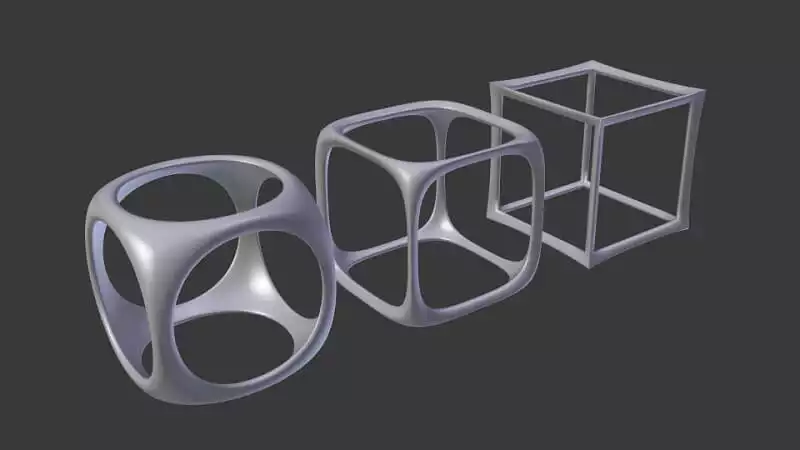
Internal lattice structures are used for many different purposes. And there are many ways to design them in Blender or Meshmixer software, one of which is to use wireframes which gives you a low-quality lattice structure even if you utilize the modifier. It would mostly be useful for artistic purposes meaning that you cannot precisely determine the size of the holes and channels and the whole object itself.We usually design our lattice structures this way when we want some aesthetics in our design but it lacks accuracy. The tool we use for this type of modeling is a wireframe modifier next to some other tools that can be used according to the preferences of the design.
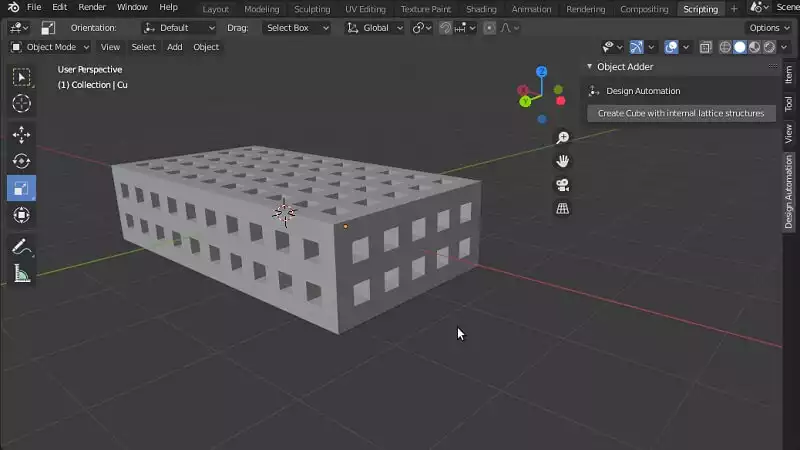
The design that we are going to work on is cube-like below. A kind of lattice structure that we can set its height, width, and length and we also determine the size of the holes and channels precisely.
In this part of the tutorial, we focus on the utility functions that will help us design our main lattice structure.
import  bpy

####################################################################
#####                Utility Functions
####################################################################

def rotation_X(object,D_yz):
        context = bpy.context
        scene = context.scene
        cube = scene.objects.get(object)
        bpy.ops.transform.rotate(value= D_yz, orient_axis='X',
                                    orient_type='GLOBAL',
                                    orient_matrix=((1, 0, 0), (0, 1, 0), (0, 0, 1)),
                                    constraint_axis=(True, False,False ))

def rotation_Y(object,D_xz):
        context = bpy.context
        scene = context.scene
        cube = scene.objects.get(object)
        bpy.ops.transform.rotate(value= D_xz, orient_axis='Y',
                                    orient_type='GLOBAL',
                                    orient_matrix=((1, 0, 0), (0, 1, 0), (0, 0, 1)),
                                    constraint_axis=(False, True,False ))

def rotation_Z(object,D_xy):
        context = bpy.context
        scene = context.scene
        cube = scene.objects.get(object)
        bpy.ops.transform.rotate(value= D_xy, orient_axis='Z',
                                    orient_type='GLOBAL',
                                    orient_matrix=((1, 0, 0), (0, 1, 0), (0, 0, 1)),
                                    constraint_axis=(False, False,True ))
The above functions will determine the rotation of any object that is given in all different directions.
def make_cube(name,Features):

    lx = Features[0]
    ly = Features[1]
    lz = Features[2]

    dx = Features[3]
    dy = Features[4]
    dz = Features[5]

    rx = Features[6]
    ry = Features[7]
    rz = Features[8]

    bpy.ops.mesh.primitive_cube_add(location=(0,0,0))
    bpy.ops.transform.resize(value=(dx, dy, dz))
    for obj in bpy.context.selected_objects:
        obj.name = name
    rotation_X(name,rx)
    rotation_Y(name,ry)
    rotation_Z(name,rz)

    context = bpy.context
    scene = context.scene
    cube = scene.objects.get(name)
    cube.location = (lx,ly,lz)
The above function will make a cube with the given name, location on all 3 axes, direction, and their dimension in length, width, and height (The size).
def get_object_by_name(obj_name):
    assert obj_name in bpy.data.objects, "Error getting object by name: {}".format(obj_name)
    obj = bpy.data.objects[obj_name]

    return obj
The above function will select an object from the list, using its name.
def make_custom_context(*object_names, base_context=None, mode=None):
    if base_context is not None:
        ctx = base_context
    else:
        ctx = {}
    if mode is not None:
        assert mode in ('OBJECT', 'EDIT'), "Wrong mode used"
        ctx['mode'] = mode
    objs = [get_object_by_name(obj_name) for obj_name in object_names]
    ctx['active_object'] = ctx['object'] = objs[0]
    ctx['selected_editable_objects'] = ctx['selected_objects'] = objs
    ctx['editable_objects'] = ctx['selectable_objects'] = ctx['visible_objects'] = objs

    return ctx

def makeUnionOpt(*object_names):
    ctx = bpy.context.copy()
    if object_names:
        ctx = make_custom_context(*object_names, base_context=ctx, mode='OBJECT')
    bpy.ops.object.join(ctx)  # mostly the same as export/import combination
Using the 2 functions above, we will be able to boolean union a lot of objects altogether at once without bringing up any open or destroyed meshes.In the next part, we will make lattice structures using the above utility functions.Creating the Main Panel of Lattice Structure
In this second part of our tutorial, we want to create a panel in Blender to be able to easily design any shape of the lattice structure that we want with any size.
####################################################################
########             Main Panel
####################################################################

class MainPanel(bpy.types.Panel):
    bl_label = "Object Adder"
    bl_idname = "VIEW_PT_MainPanel"
    bl_space_type = 'VIEW_3D'
    bl_region_type = 'UI'
    bl_category = 'Design Automation'

    def draw(self, context):
        layout = self.layout
        layout.scale_y = 1.2

        row = layout.row()
        row.label(text= "Design Automation", icon= 'OBJECT_ORIGIN')
        row = layout.row()
        row.operator("wm_function.myop", text= "Create Cube with internal lattice structures")

####################################################################
####                  Main UI ّFunctions
####################################################################

class WM_Function_myOp(bpy.types.Operator):
    """Click to apply our customized function"""
    bl_label = "Our customized function"
    bl_idname = "wm_function.myop"

    ls = bpy.props.FloatProperty(name= "Enter the size of lattice", default= 0.25)
    cw = bpy.props.FloatProperty(name= "Enter the WIDTH of the object", default= 2.5)
    cl = bpy.props.FloatProperty(name= "Enter the LENGTH of the object", default= 5.0)
    ch = bpy.props.FloatProperty(name= "Enter the HEIGHT of the object", default= 1.0)

    def execute(self, context):

        LATTICE_SIZE = self.ls
        CUBE_WIDTH = self.cw
        CUBE_LENGTH = self.cl
        CUBE_HEIGHT = self.ch
        return {'FINISHED'}

    def invoke(self, context, event):
        return context.window_manager.invoke_props_dialog(self)
After receiving the required parameters from the user, we will determine the number of square cylinders or rods in all 3 axis:
nRodx = (CUBE_LENGTH / LATTICE_SIZE)+2
nRody = (CUBE_WIDTH / LATTICE_SIZE)+2
nRodz = (CUBE_HEIGHT / LATTICE_SIZE)+2
We also apply a modification in the width, length, and height of the cube, as we want to place all of the holes inside the cube.
CUBE_WIDTH = CUBE_WIDTH + LATTICE_SIZE*3
CUBE_LENGTH = CUBE_LENGTH + LATTICE_SIZE*3
CUBE_HEIGHT = CUBE_HEIGHT + LATTICE_SIZE*3
And we also determine the height of each square rod:
rodHeightx = CUBE_LENGTH - LATTICE_SIZE*2
rodHeighty = CUBE_WIDTH - LATTICE_SIZE*2
rodHeightz = CUBE_HEIGHT - LATTICE_SIZE*2
And the starting point of where we want to start placing our rods:
startx = CUBE_LENGTH/2 - LATTICE_SIZE*1.5
starty = CUBE_WIDTH/2 - LATTICE_SIZE*1.5
startz = CUBE_HEIGHT/2 - LATTICE_SIZE*1.5
Now, we use for loops to create and places all the cubes on XY plane:
for i in range(int(nRodx/2)):
     for j in range(int(nRody/2)):
          make_cube("Cube",(startx-2*i*LATTICE_SIZE, starty-2*j*LATTICE_SIZE, 0, LATTICE_SIZE/2,
                    LATTICE_SIZE/2, rodHeightz/2, 0, 0, 0))
          if((i+j) != 0):
               makeUnionOpt('Cube','Cube.001')
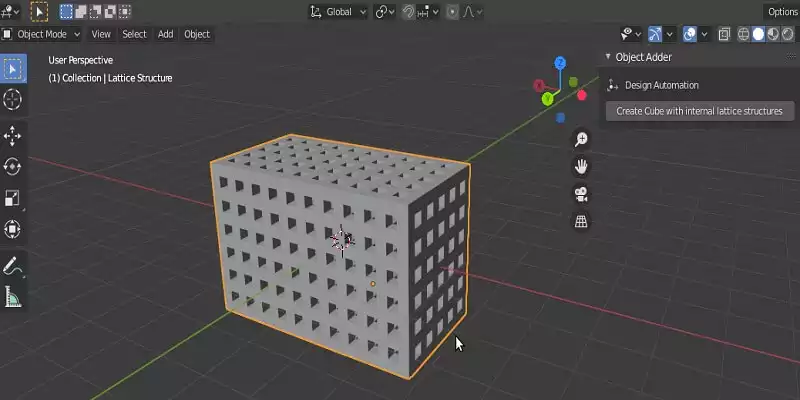
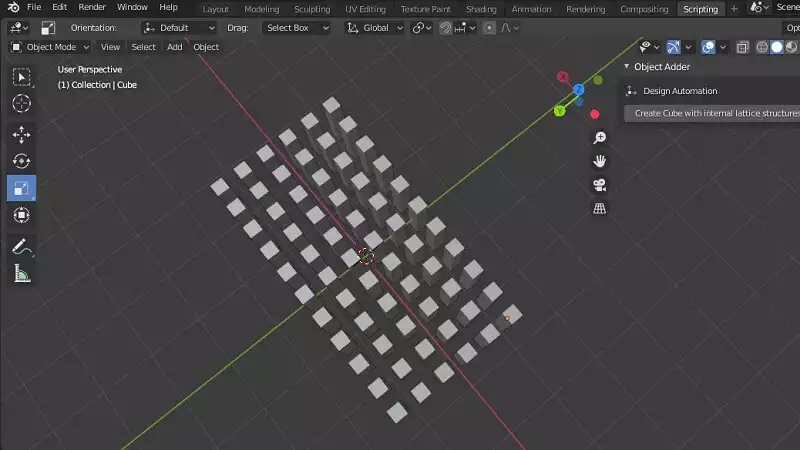
Placing the vertical cubic cylinders:If we run the code up to here, we will get the following result. We will be able to see a large set of cubic cylinders that appear all at once, when we click the button (Create Cube with internal lattice structures):Placing the Horizontal Cubic Cylinders
We are not done yet. To get the complete lattice structure we should place the horizontal cubic cylinders. To do so, we should write the following for loops in thedef execute() function after the for loops written for the vertical rods. we should place the rods in XZ plane (horizontal cubic cylinders) using the following script:
for i in range(int(nRodx/2)):
     for j in range(int(nRodz/2)):
          make_cube("C",(startx-2*i*LATTICE_SIZE, 0, startz-2*j*LATTICE_SIZE,LATTICE_SIZE/2,rodHeighty/2,
                    LATTICE_SIZE/2, 0, 0, 0))
          if((i+j) != 0):
               makeUnionOpt('C', 'C.001')
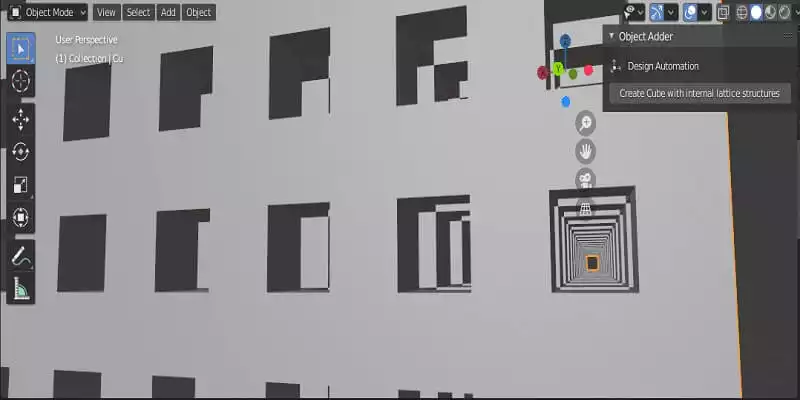
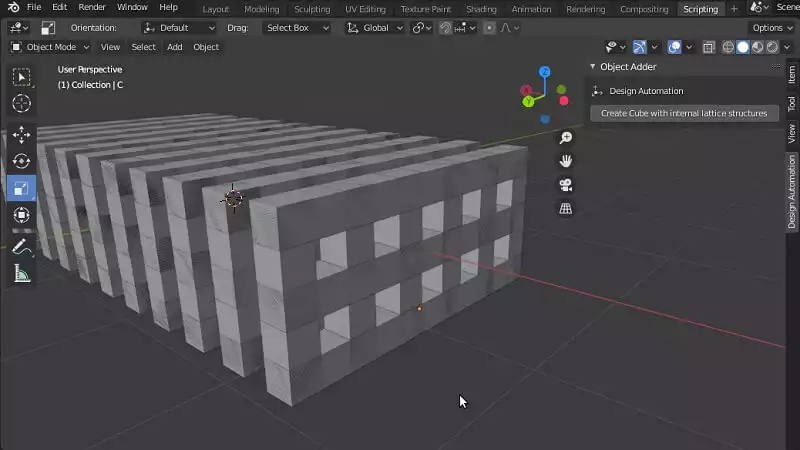
The result up to here will be like this:YZ plane.Completing the Project
And finally, we should place the rods onYZ plane to get the complete model of internal lattice structure. The following code containing for loops should be writ-ten after the 2 previous set of for loops to serve our purpose:
for i in range(int(nRody/2)):
     for j in range(int(nRodz/2)):
          make_cube("Cu", (0, starty-2*i*LATTICE_SIZE, startz-2*j*LATTICE_SIZE, rodHeightx/2,
                         LATTICE_SIZE/2, LATTICE_SIZE/2, 0, 0, 0))
           if((i+j) != 0):
                makeUnionOpt('Cu','Cu.001')
We also boolean union all three set of rods using the utility boolean union function we wrote in the last section:
makeUnionOpt('Cu','C','Cube')
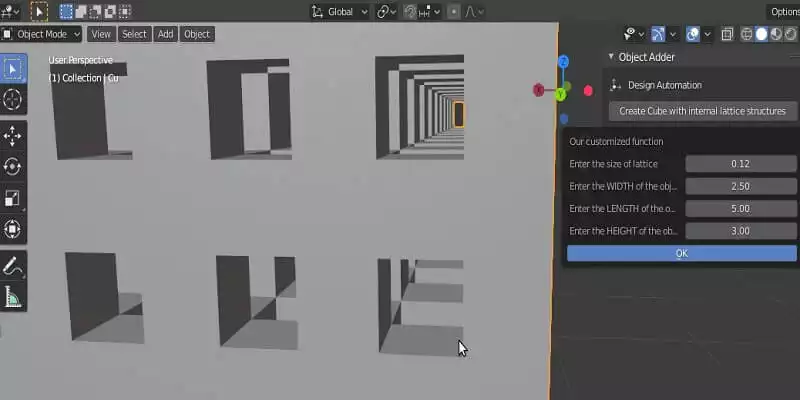
The result will be like this:
####################################################################
#####                     Register and Unregister
####################################################################

def register():
    bpy.utils.register_class(MainPanel)
    bpy.utils.register_class(WM_Function_myOp)

def unregister():
    bpy.utils.unregister_class(MainPanel)
    bpy.utils.unregister_class(WM_Function_myOp)

if __name__ == "__main__":
    register()
Now, using the above interface, you will be able to design and modify a robust internal lattice structure in a few seconds. You can also boolean intersect it with the shape that you want and make that shape have an internal lattice structure.Conclusion
In this tutorial, we have introduced all types of lattice structures including the ones in beauty and aesthetics are considered more important than accuracy of size and also the ones that accuracy of the dimensions is placed on top of our priorities. We have also managed to get started with the design of an internal lattice structure with accurate dimensions of height, width, and length for the object and the channels.Finally, we have managed to complete the design tool for creating an internal lattice structure with accurate dimensions. Using the said tool which is provided in a panel, you can design a cube with a certain height, width, length, and internal lattice structures. Moreover, you can use the boolean intersect modifier to apply the said internal lattice structure on any object with any shape.
Download this Article in PDF format

Check Out Our Services
In Arashtad, we’re working on 3D games, metaverses, and other types of WebGL and 3D applications with our 3D web development team. However, our services are not limited to these. Back-end developments, front-end developments, 3d modeling, and animations are in our arsenal too.

