Bump Map vs Normal Map in Three JS
In many 3D designing platforms, especially in WebGL and the Three.js, we have the concept of bump map, normal map and the displacement map. You have probably heard or read about these three kind of mappings, if you have ever searched about the textures and how to create them. The main reason we use these mappings, is to create either the illusion or the effect of the bumps and dumps on the surface of a texture. Definitely, using the said mappings will make a huge difference in your design and that is why we have decided to talk about these concepts in our article. When we talk about these three mappings, we do not mean the texture itself. Because even if you have a photo of a certain kind of texture or any surface that you might have captured using your camera, you can still map it on top of an object. But if you want to have a natural texture, with all the ups and downs, you definitely need one or a group of the three main mappings. In this article, we want to get familiar with all these mappings and use them in three.js scripts.
What is a bump map?
Bump maps create the illusion of depth and texture on the surface of a 3D model using computer graphics. This kind of mapping is the older version of creating the effect of the wrinkles, cracks, bumps, and dumps. These days, the displacement map and the normal map are more popular because they create the more realistic kind of a texture by creating the actual ups and downs and not just the illusion of it. On the other hand, in the bump map, textures are artificially created on the surface of objects using grayscale and simple lighting tricks, rather than having to manually create individual bumps and cracks. Generally, bump maps are grayscale images that contain 8-bit data of color information. In other words, there are 256 levels between white and black color that determine how deep or how high a point on the surface is. The point with no detail or no up or down, will get 128 or 50 percent of the maximum number. As the color gets more black, the point gets deeper into the surface and as the color gets white, the point will get high.What is a normal map?
Normal map is the newer version of the bump map and the data related to the bumps and dumps is fake as well. The only difference is that a bump map uses grayscale values to to provide either up or down information. A normal map uses RGB information that corresponds directly with the X, Y and Z axis in 3D space. This RGB information tells the 3D application the exact direction of the surface normals are oriented in for each and every polygon. The orientation of the surface normals, often just referred to as normals, tell the 3D application how the polygon should be shaded.What is a displacement map?
Contrary to the normal map and the bump map, the displacement map does not create an illusion of up or down. The bumps and dumps will be created in a realistic way and if you apply it on the surface of any object, you will be able to see the ups and downs clearly if zoom onto the surface. Like the bump map, the displacement map uses the grayscale values to measure the ups and downs. The precision can vary from 8-bit to 16 or even 32-bit data. The higher the resolution, the better the end result.A simple example from scratch:
We will get started with the main elements of a Three js scene, including the camera, the renderer, the scene, and the object. Before doing that, we use the Vite plugin to easily create all the folders and files you need to run the Three.js code. First off, create a folder in the directory of your projects by using the following commands:
mkdir Mappings
cd Mappings
Then, inside of the your project folder, create the necessary files and folders by
simply running the Vite plugin command:
npm create vite@latest
Then enter the name of the project. You can write the name of your project as the
name. And also the package (the name is arbitrary, and you can choose anything
you want). Then select vanilla as the framework and variant. After that, enter the
following commands in the terminal. Notice that here Mappings is the project
folder’s name, and thus, we have changed the directory to Mappings. The name
depends on the name you enter in the Vite plugin :
cd Mappings
npm install
Afterward, you can enter the JavaScript code you want to write in the main.js file. So,
we will enter the base or template code for running every project with an animating
object, such as a sphere. Also, do not forget to install the Three.js package library
every time you create a project:
npm install three
The code (using the mappings together):
Now, enter the following script in the main.js file:
import * as THREE from 'three';
import { Mesh } from 'three';
const scene = new THREE.Scene();
const camera = new THREE.PerspectiveCamera(75, innerWidth /innerHeight , 0.1, 1000);
const renderer = new THREE.WebGLRenderer({
     antialias : true;
})
renderer.setSize(innerWidth, innerHeight);
document.body.appendChild(renderer.domElement);
//creating a sphere
const geometry = new THREE.SphereGeometry(5,50,50);
const material = new THREE.MeshStandardMaterial({
     map : new THREE.TextureLoader().load('./img/aerial_rocks_02_diff_4k.jpg');
})
material.displacementMap = new THREE.TextureLoader().load './img/aerial_rocks_02_disp_1k.jpg');
material.normalMap = new THREE.TextureLoader().load('./img/aerial_rocks_02_nor_dx_1k.jpg');

const sphere = new THREE.Mesh(geometry, material);
scene.add(sphere);
camera.position.z = 15;
const width = 20;
const height = 20;
const intensity = 2.5;

const rectLight = new THREE.RectAreaLight(0xffffff, intensity, width, height);
rectLight.position.set( 5, 5, 5 );
rectLight.lookAt( 0.5, 0.5, 0.5 );
scene.add( rectLight );

function animate(){
     requestAnimationFrame(animate);
     renderer.render(scene,camera);
     sphere.rotation.y += 0.003;
}
animate();
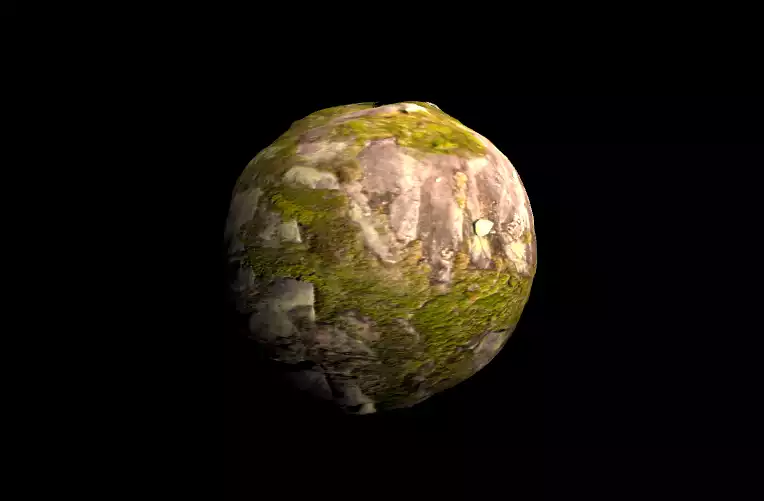
Now if we save the code, and enter the following command in the terminal:
npm run dev
The above script will give the following result:
const material = new THREE.MeshStandardMaterial({
     map : new THREE.TextureLoader().load('./img/aerial_rocks_02_diff_4k.jpg');
})
material.displacementMap = new THREE.TextureLoader().load './img/aerial_rocks_02_disp_1k.jpg');
material.normalMap = new THREE.TextureLoader().load('./img/aerial_rocks_02_nor_dx_1k.jpg');
We have got the texture from polyhaven.com. If you want to use the bump map
instead of the displacement map and the normal map, you should rewrite the above
code this way:
const material = new THREE.MeshStandardMaterial({
     map : new THREE.TextureLoader().load('./img/aerial_rocks_02_diff_4k.jpg');
})
material.bumpMap = new THREE.TextureLoader().load './img/');
Notice that you should enter the NameOfThePhoto according to the name of the
bump map image that you have and do not forget to put it in the img folder that you
have created in the project directoryConclusion
In this article, we got familiar with the different kinds of mappings including the displacement map, normal map and the bump map. We used these mappings to make the texture more realistic. However, some of them only create the illusion of bumps and dumps and if you zoom in, you will understand that there are actually no ups and downs. Moreover, we worked on the script of a texture from scratch and learned how to create a texture on a sphere and add different mappings to the object. This example will help you work with different kinds of textures. We have also covered a full tutorial on this subject in another article on our blog. Make sure to check it out.Download this Article in PDF format

Arashtad Custom Services
In Arashtad, we have gathered a professional team of developers who are working in fields such as 3D websites, 3D games, metaverses, and other types of WebGL and 3D applications as well as blockchain developemnet.


