Crowdfunding Smart Contract on Mainnet and Other Networks: A Perfect Tutorial
In this tutorial, we are going to write the complete scripts for the crowdfunding smart contract and organize the files related to the deployment of the smart contract in their own folders. We are also going to create a .env file to keep the private key and Infura project ID somewhere safe. In addition to that, the config file is going to help us categorize different networks with their account addresses.
Crowdfunding Smart Contract: Where to Start?
To start writing scripts for crowdfunding smart contracts, we are going to modify the code in a way that it will be possible to work with different networks such as Ganache CLI, development, Rinkeby, Mainnet, and so on. The folders and files remain the same and we only modify some of the scripts and add some other files to the project. Follow the steps and read the explanations to understand why we do what we do:1. Inside the contracts folder, create another folder and name it test. And inside of it create a file called, MockV3Aggregator.sol then copy and paste this link URL into it:
The reason we do this, is to be able to use it when we are working with Ganache CLI and other networks as well.
2. We need to also modify FundMe.sol just a bit to be able to enter the eth_to_usd address for all the networks:
// SPDX-License-Identifier: MIT

pragma solidity ^ 0.6.6;

import "@chainlink/contracts/src/v0.6/interfaces/AggregatorV3Interface.sol";
import "@chainlink/contracts/src/v0.6/vendor/SafeMathChainlink.sol";

contract FundMe {

	using SafeMathChainlink for uint256;
	mapping(address => uint256) public addressToAmountFunded;
	address[] public funders;
	address public owner;
	AggregatorV3Interface public priceFeed;

	constructor(address _priceFeed) public {
		priceFeed = AggregatorV3Interface(_priceFeed);
		owner = msg.sender;
	}

	function fund() public payable {
		uint256 minimumUSD = 50 * 10**18;
		require(getConversionRate(msg.value) >= minimumUSD,"You need to spend more ETH!");
		addressToAmountFunded[msg.sender] += msg.value;
		funders.push(msg.sender);
	}

	function getVersion() public view returns (uint256) {
		return priceFeed.version();
	}

	function getPrice() public view returns (uint256) {
		(, int256 answer, , , ) = priceFeed.latestRoundData();
		return uint256(answer * 10000000000);
	}


	function getConversionRate(uint256 ethAmount) public view returns (uint256) {
		uint256 ethPrice = getPrice();
		uint256 ethAmountInUsd = (ethPrice * ethAmount) / 1000000000000000000;
		return ethAmountInUsd;
	}

	function getEntranceFee() public view returns (uint256) {
		uint256 minimumUSD = 50 * 10**18;
		uint256 price = getPrice();
		uint256 precision = 1 * 10**18;
		return ((minimumUSD * precision) / price) + 1;
	}

	modifier onlyOwner() {
		require(msg.sender == owner);
		_;
	}

	function withdraw() public payable onlyOwner {
		msg.sender.transfer(address(this).balance);
		for (uint256 funderIndex = 0;funderIndex < funders.length;funderIndex++){
			address funder = funders[funderIndex];
			addressToAmountFunded[funder] = 0;
		}
		funders = new address[](0);
	}
}
Notice that in the above contract, we have defined AggregatorV3Interface public priceFeed and also a constructor for it as priceFeed = AggregatorV3Interface(_priceFeed). And later in the get price instead of Rinkeby eth_to_usd address code we have used this priceFeed variable to fetch ETH price.
3. Also, in the brownie-config.yaml, we enter this networks declaration:
networks:
	default: development
	rinkeby:
		eth_usd_price_feed: '0x8A753747A1Fa494EC906cE90E9f37563A8AF630e'
		verify: True
	mainnet-fork-dev:
		eth_usd_price_feed: '0x5f4eC3Df9cbd43714FE2740f5E3616155c5b8419'
		verify: False
	development:
		verify: False
	ganache-local:
		verify: False
Here, we define all kinds of price feeds related to Mainnet and Rinkeby. Also, define development and ganache-local networks. Next to every network name, we define whether it is going to be verified for publishing or not.
4. In the helpful_scripts.py, we write:
from brownie import network, config, accounts, MockV3Aggregator
from web3 import Web3

FORKED_LOCAL_ENVIRONMENTS = ["mainnet-fork", "mainnet-fork-dev"]
LOCAL_BLOCKCHAIN_ENVIRONMENTS = ["development", "ganache-local"]

DECIMALS = 8
STARTING_PRICE = 200000000000

def get_account():
	if (network.show_active() in LOCAL_BLOCKCHAIN_ENVIRONMENTS or network.show_active() in
        		FORKED_LOCAL_ENVIRONMENTS):
		return accounts[0]
	else:
		return accounts.add(config["wallets"]["from_key"])

def deploy_mocks():
	print(f"The active network is {network.show_active()}")
	print("Deploying Mocks...")
	if len(MockV3Aggregator) <= 0:
		MockV3Aggregator.deploy(DECIMALS, STARTING_PRICE, {"from": get_account()})
		print("Mocks Deployed!")
In this helpful_scripts.py file, we have defined all networks and helped the deploy.py choose the proper account according to the network that is currently active. We have also defined another function for the deploy_mocks.py file, which is going to be explained later.
4. Inside the scripts folder, create a file named deploy_mocks.py and paste the below scripts in it. Use this script if you want to deploy mocks to a Testnet:
from brownie import ( MockV3Aggregator, network,)
from scripts.helpful_scripts import (get_account,)

DECIMALS = 8
INITIAL_VALUE = 200000000000

def deploy_mocks():

	print(f"The active network is {network.show_active()}")
	print("Deploying Mocks...")
	account = get_account()
	MockV3Aggregator.deploy(DECIMALS, INITIAL_VALUE, {"from": account})
	print("Mocks Deployed!")

def main():
	deploy_mocks()
5. Inside the scripts folder create a new file called, fund_and_withdraw.py and paste these scripts in it:
from brownie import FundMe
from scripts.helpful_scripts import get_account

def fund():
	fund_me = FundMe[-1]
	account = get_account()
	entrance_fee = fund_me.getEntranceFee()
	print(entrance_fee)
	print(f"The current entry fee is {entrance_fee}")
	print("Funding")
	fund_me.fund({"from": account, "value": entrance_fee})

def withdraw():
	fund_me = FundMe[-1]
	account = get_account()
	fund_me.withdraw({"from": account})

def main():
	fund()
	withdraw()
Using the above script, we can interact with our own contract without the need to use the Etherscan interface for our contract. We can fund the contract and withdraw from it.
6. And in the end, it is finally the time to modify deploy.py:
from brownie import FundMe, MockV3Aggregator, network, config
from scripts.helpful_scripts import (
	get_account,
	deploy_mocks,
	LOCAL_BLOCKCHAIN_ENVIRONMENTS,
	)

def deploy_fund_me():
	account = get_account()
	if network.show_active() not in LOCAL_BLOCKCHAIN_ENVIRONMENTS:
		price_feed_address = config["networks"][network.show_active()]["eth_usd_price_feed"]
	else:
		deploy_mocks()
		price_feed_address = MockV3Aggregator[-1].address

	fund_me = FundMe.deploy( price_feed_address,{"from": account},publish_source=config["networks"]
		[network.show_active()].get("verify"),)
	print(f"Contract deployed to {fund_me.address}")
	return fund_me

def main():
	deploy_fund_me()
The above deploy.py script which has been integrated to work with different networks, first checks which network we are in. Then, it fetches the price feed. And then, it deploys the contract using the price feed address, an account that is chosen according to the active network, and the verification state-related whether we want to publish the contract or not that has been declared in brownie-config.yaml. And then we finally deploy the contract. In the next part of this tutorial, we are going to run this project and see if it works properly.

Need More Python Web3 Understanding?
If you're having hard time understanding what's going on in this article, you probably missed our article explaining how to deploy a smart contract using Python web3 tools. By reading it, this article will become much easier.
Crowdfunding Smart Contract: Testing the Scripts
In this article, we are going to write the test scripts related to the deployment of the Fundme.sol smart contract we wrote earlier in the previous article. This testing process is going to be applied on the Ganache simulated blockchain which is local. Ganache is the best network that can be used for testing.
For running and testing our deployment, we need to create a test_fund_me.py file inside the test folder and paste the following code in it:
from scripts.helpful_scripts import get_account, LOCAL_BLOCKCHAIN_ENVIRONMENTS
from scripts.deploy import deploy_fund_me
from brownie import network, accounts, exceptions
import pytest

def test_can_fund_and_withdraw():
	account = get_account()
	fund_me = deploy_fund_me()
	entrance_fee = fund_me.getEntranceFee() + 100
	tx = fund_me.fund({"from": account, "value": entrance_fee})
	tx.wait(1)
	assert fund_me.addressToAmountFunded(account.address) == entrance_fee
	tx2 = fund_me.withdraw({"from": account})
	tx2.wait(1)
	assert fund_me.addressToAmountFunded(account.address) == 0

	def test_only_owner_can_withdraw():
	if network.show_active() not in LOCAL_BLOCKCHAIN_ENVIRONMENTS:
		pytest.skip("only for local testing")
		fund_me = deploy_fund_me()
		bad_actor = accounts.add()
		with pytest.raises(exceptions.VirtualMachineError):
			fund_me.withdraw({"from": bad_actor})
Also, do not forget to install pytest.by:
pip install pytest
Now, if we want to compile our project, in the console we write:
brownie compile
The result should be something like this:
Brownie v1.18.1 - Python development framework for EthereumCompiling contracts...
Solc version: 0.6.12
Optimizer: Enabled Runs: 200
EVM Version: Istanbul
Generating build data...
- smartcontractkit/[email protected]/AggregatorInterface
- smartcontractkit/[email protected]/AggregatorV2V3Interface
- smartcontractkit/[email protected]/AggregatorV3Interface
- MockV3AggregatorProject has been compiled. Build artifacts saved at/home/mohamad/brownie_fund_me/build/contracts
And now, to discover all of the brownie networks lists, we type:
brownie networks list
Result:
Brownie v1.18.1 - Python development framework for EthereumThe following networks are declared:Ethereum
├─Mainnet (Infura): mainnet
├─Ropsten (Infura): ropsten
├─Rinkeby (Infura): rinkeby
├─Goerli (Infura): goerli
└─Kovan (Infura): kovanEthereum Classic
├─Mainnet: etc
└─Kotti: kottiArbitrum
└─Mainnet: arbitrum-mainAvalanche
├─Mainnet: avax-main
└─Testnet: avax-testAurora
├─Mainnet: aurora-main
└─Testnet: aurora-testBinance Smart Chain
├─Testnet: bsc-test
└─Mainnet: bsc-mainFantom Opera
├─Testnet: ftm-test
└─Mainnet: ftm-mainHarmony
└─Mainnet (Shard 0): harmony-mainMoonbeam
└─Mainnet: moonbeam-mainOptimistic Ethereum
├─Mainnet: optimism-main
└─Kovan: optimism-testPolygon
├─Mainnet (Infura): polygon-main
└─Mumbai Testnet (Infura): polygon-testXDai
├─Mainnet: xdai-main
└─Testnet: xdai-testDevelopment
├─Ganache-CLI: development
├─Geth Dev: geth-dev
├─Hardhat: hardhat
├─Hardhat (Mainnet Fork): hardhat-fork
├─Ganache-CLI (Mainnet Fork): mainnet-fork
├─Ganache-CLI (BSC-Mainnet Fork): bsc-main-fork
├─Ganache-CLI (FTM-Mainnet Fork): ftm-main-fork
├─Ganache-CLI (Polygon-Mainnet Fork): polygon-main-fork
├─Ganache-CLI (XDai-Mainnet Fork): xdai-main-fork
├─Ganache-CLI (Avax-Mainnet Fork): avax-main-fork
└─Ganache-CLI (Aurora-Mainnet Fork): aurora-main-fork
Now, we should add Ganache to Ethereum networks, to be able to keep track of our transactions inside the deployments folder. To do that, according to our host address and chainid, we write:
brownie networks add Ethereum ganache-local host=http://127.0.0.1:7545 chainid=5777
Result:
Brownie v1.18.1 - Python development framework for EthereumSUCCESS: A new network 'ganache-local' has been added
└─ganache-local
├─id: ganache-local
├─chainid: 5777
└─host: http://127.0.0.1:7545
And it has successfully been added. Now to make sure, again we write in the console:
brownie networks list
Result:
Brownie v1.18.1 - Python development framework for EthereumThe following networks are declared:Ethereum
├─Mainnet (Infura): mainnet
├─Ropsten (Infura): ropsten
├─Rinkeby (Infura): rinkeby
├─Goerli (Infura): goerli
├─Kovan (Infura): kovan
└─ganache-local: ganache-local………………………..
We can see that ganache-local has been added to the Ethereum networks list.
Now, in order to run our deploy.py on ganache-local:
brownie run scripts/deploy.py --network ganache-local
result:
Brownie v1.18.1 - Python development framework for EthereumCompiling contracts...
Solc version: 0.6.12
Optimizer: Enabled Runs: 200
EVM Version: Istanbul
Generating build data...
- smartcontractkit/[email protected]/AggregatorV3Interface
- smartcontractkit/[email protected]/SafeMathChainlink
- FundMeBrownieFundMeProject is the active project.Running 'scripts/deploy.py::main'...
The active network is ganache-local
Deploying Mocks...
Mocks Deployed!
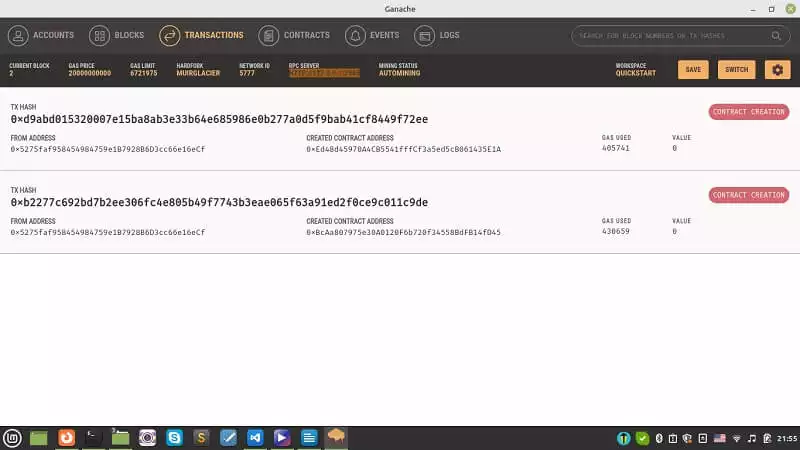
Transaction sent: 0xd9abd015320007e15ba8ab3e33b64e685986e0b277a0d5f9bab41cf8449f72ee
Gas price: 20.0 gwei Gas limit: 446315 Nonce: 1
FundMe.constructor confirmed Block: 2 Gas used: 405741 (90.91%)
FundMe deployed at: 0xEd48d45970A4CB5541fffCf3a5ed5cB061435E1AContract deployed to 0xEd48d45970A4CB5541fffCf3a5ed5cB061435E1A
And we can track the transaction on Ganache.
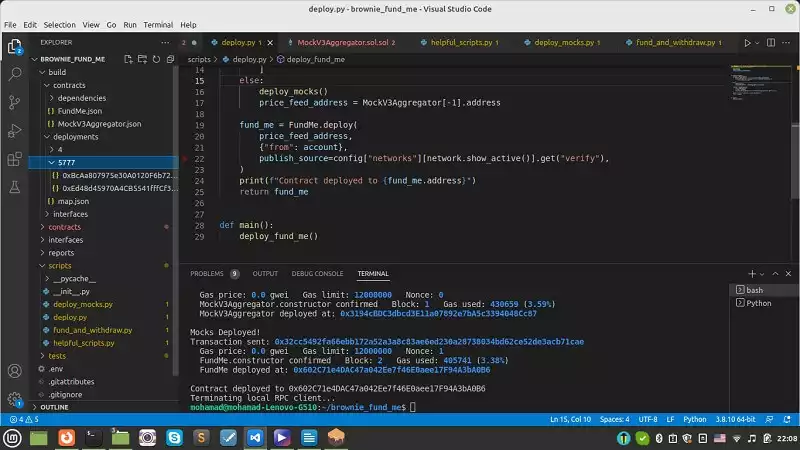
Also, see the records on build/deployments folder (Notice the 5777 as the chain id and the corresponding .json files).
The rest of our code execution will be continued in the next part.
Crowdfunding Smart Contract: Running A Specific Network
In this tutorial, we try to connect to Mainnet-fork dev to complete the list of networks that we can connect to. We also try to execute the fund and withdraw transactions and put it to the test. If we want to use a development network other than the persistent one, we can copy the HTTP address from alchemy.io and the Ganache CLI to be able to connect to a development network other than the Infura host node.
We continue our crowdfunding deployment execution here.
The other networks can be run with:
brownie run scripts/deploy.py --network
Also, as declared in brownie-config.yaml, the default network is development which is Ganache, so by running:
brownie run scripts/deploy.py
We will get:
Brownie v1.18.1 - Python development framework for EthereumBrownieFundMeProject is the active project.Launching 'ganache-cli --chain.vmErrorsOnRPCResponse true --wallet.totalAccounts 10 --hardfork istanbul --miner.blockGasLimit 12000000 --wallet.mnemonic brownie --server.port 8545'...Running 'scripts/deploy.py::main'...
The active network is development
Deploying Mocks...
Transaction sent: 0xb7fcc22911055aa0e06bb329d0b366065e4c01e37827c19975048cb8324cb581
Gas price: 0.0 gwei Gas limit: 12000000 Nonce: 0
MockV3Aggregator.constructor confirmed Block: 1 Gas used: 430659 (3.59%)
MockV3Aggregator deployed at: 0x3194cBDC3dbcd3E11a07892e7bA5c3394048Cc87Mocks Deployed!
Transaction sent: 0x32cc5492fa66ebb172a52a3a8c83ae6ed230a28738034bd62ce52de3acb71cae
Gas price: 0.0 gwei Gas limit: 12000000 Nonce: 1
FundMe.constructor confirmed Block: 2 Gas used: 405741 (3.38%)
FundMe deployed at: 0x602C71e4DAC47a042Ee7f46E0aee17F94A3bA0B6Contract deployed to 0x602C71e4DAC47a042Ee7f46E0aee17F94A3bA0B6
Terminating local RPC client…
Executing fund and withdraw
Now, it is time to interact with our contract by funding and withdrawing using the scripts/fund_and_withdraw.py, So to do that, in the terminal, we type:
brownie run scripts/fund_and_withdraw.py --network ganache-local
Result:
Brownie v1.18.1 - Python development framework for EthereumBrownieFundMeProject is the active project.Running 'scripts/fund_and_withdraw.py::main'...
25000000000000001
The current entry fee is 25000000000000001
Funding
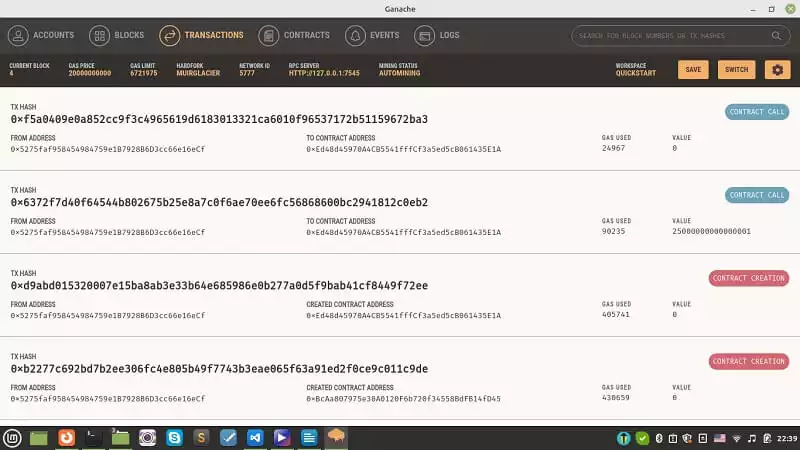
Transaction sent: 0x6372f7d40f64544b802675b25e8a7c0f6ae70ee6fc56868600bc2941812c0eb2
Gas price: 20.0 gwei Gas limit: 99258 Nonce: 2
FundMe.fund confirmed Block: 3 Gas used: 90235 (90.91%)Transaction sent: 0xf5a0409e0a852cc9f3c4965619d6183013321ca6010f96537172b51159672ba3
Gas price: 20.0 gwei Gas limit: 76963 Nonce: 3
FundMe.withdraw confirmed Block: 4 Gas used: 24967 (32.44%)
And we can see that both fund and withdraw transactions have been successfully executed. If we look at the Ganache transactions, we will be able to see the track of the transactions:
It is now time to test the project by running the following command in the terminal:
brownie test
Result:
Brownie v1.18.1 - Python development framework for Ethereum============================================= test session starts ==============================================
platform linux -- Python 3.8.10, pytest-6.2.5, py-1.11.0, pluggy-1.0.0
rootdir: /home/mohamad/brownie_fund_me
plugins: eth-brownie-1.18.1, web3-5.27.0, xdist-1.34.0, forked-1.4.0, hypothesis-6.27.3
collected 2 itemsLaunching 'ganache-cli --chain.vmErrorsOnRPCResponse true --wallet.totalAccounts 10 --hardfork istanbul --miner.blockGasLimit 12000000 --wallet.mnemonic brownie --server.port 8545'...tests/test_fund_me.py .. [100%]============================================== 2 passed in 2.59s ===============================================
Terminating local RPC client...
And we see that the tests are passed, which shows both funds and withdraw functions work correctly and also only the owner can withdraw.
Adding a Development Network
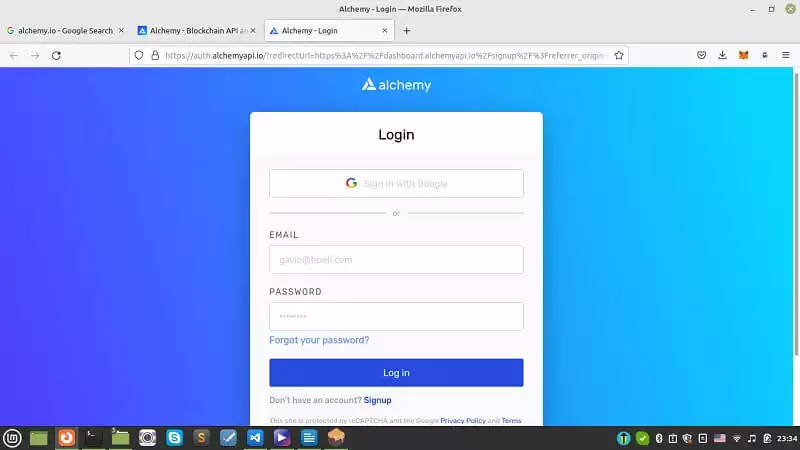
Now, it is time to add a development network instead of a persistent network and we use a host node other than Infura. To do that, we should head over to the alchemy.io link and sign up or log in.
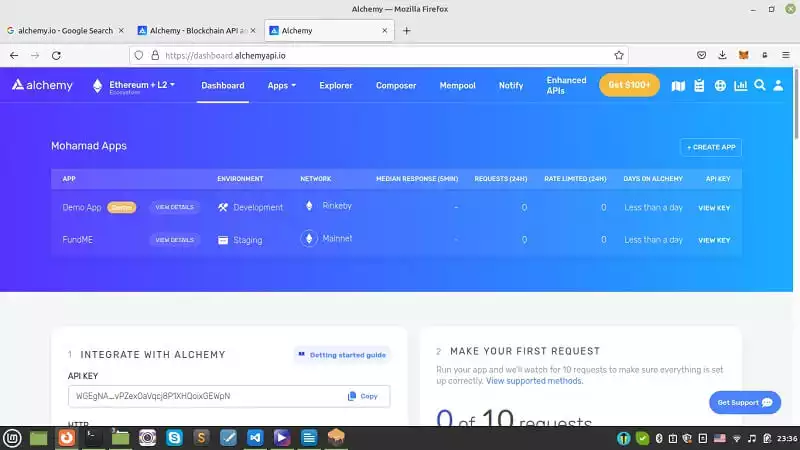
There are some steps that you need to take. And after you enter your profile, press the create app button:
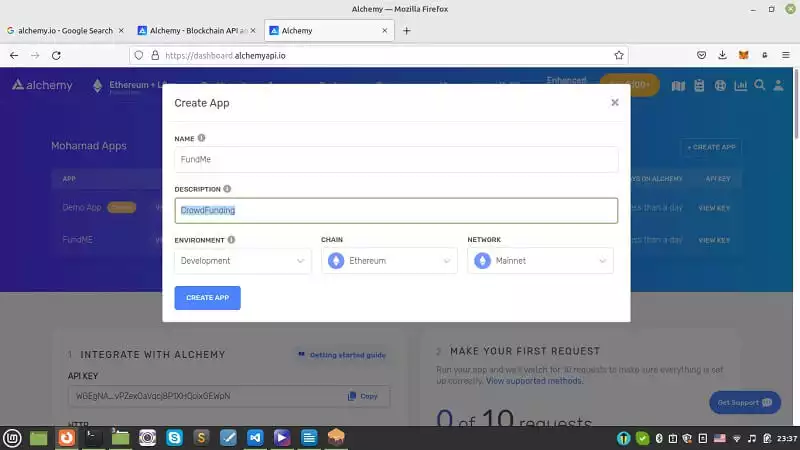
Then, create a Mainnnet development Ethereum app (enter any name you like in the 2 boxes).
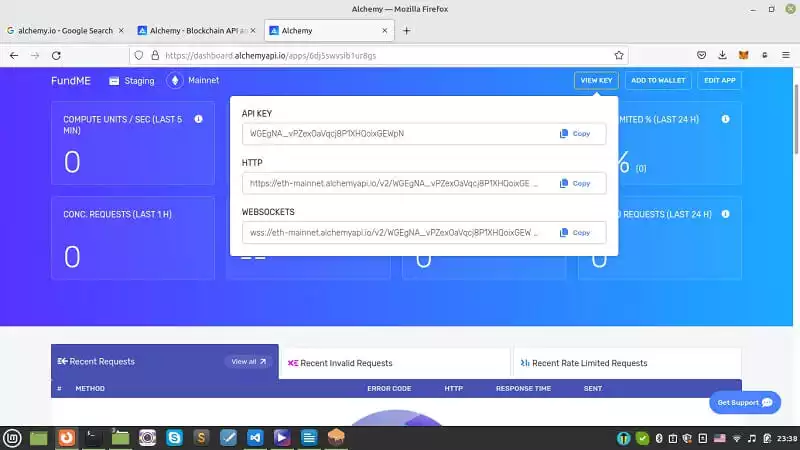
Then, enter the app and click on the view key on top of the page.
Copy the HTTP address and paste it into the fork section of the below command:
brownie networks add development mainnet-fork-dev cmd=ganache-cli host=http://127.0.0.1 fork=https://eth-mainnet.alchemyapi.io/v2/pGl-uSqPKVYCu4IpI1bjpK6dzxmLImD4 accounts=10 mnemonic=brownie port=8545
After you hit enter, the result will be:
Brownie v1.18.1 - Python development framework for EthereumSUCCESS: A new network 'mainnet-fork-dev' has been added
└─mainnet-fork-dev
├─id: mainnet-fork-dev
├─cmd: ganache-cli
├─cmd_settings: {'fork': 'https://eth-mainnet.alchemyapi.io/v2/pGl-uSqPKVYCu4IpI1bjpK6dzxmLImD4', 'accounts': 10, 'mnemonic': 'brownie', 'port': 8545}
└─host: http://127.0.0.1
And there we go. We have successfully added the Mainnet fork dev network.Congratulations! You have finally completed the crowdfunding project that can be run on different networks.
Conclusion:In this tutorial, we have worked on the different scripts that we need to set up the crowdfunding project using Brownie. If you have read our article on writing the Fundme.sol smart contract in Remix IDE, you must be familiar with how the structure of the smart contract. Here, to make scripts more organized, we have added other python files such as helpful_scripts.py to manage the accounts from different networks, deploy_mocks.py, fund_and_withdraw.py, and also brownie_config.yaml to categorize the networks and the necessary data related to them.
In this article, we have written the test scripts necessary to test the deployment of the smart contract. For the testing, we have used the Ganache simulated blockchain which is local and thus the best option for applying different tests in the smart contracts.
In this article, we have managed to connect to Mainnet fork dev to complete the list of networks that we can connect to. We also have also tried to execute the fund and withdraw transactions and put it to the test. If we want to use a development network other than the persistent one, we can copy the HTTP address from alchemy.io and the Ganache CLI to be able to connect to a development network other than the Infura host node.
Download this Article in PDF format

We Are Working on Metaverses
Metaverses, 3d modeling, 3d application, 3d websites, and even animations are just some of our vase expertise.

