How to transfer USDT on Tron Network using Tronweb?
As we have mentioned earlier in our previous Previous article about Tron, this Blockchain, is one of the most popular networks among the blockchain users and developers. One of the main reasons is that it has low gas fees and at the same time high-speed and secure network. One of the main reasons that have made this blockchain so famous is the one-dollar gas fee. Of course, this is pretty much lower than that of the Ethereum network. Surely, one of the problems is that it is not very well documented the way the Ethereum development environment is. You cannot easily figure out an explicit way to send TRC-20 Usdt using the Tron network using python or JavaScript codes. In this article, we will show you how you can easily send TRC-20 Usdt on the TRON network by the means of Python and JavaScript codes.
The Importance of Transferring TRC-20 Usdt
There are many Blockchain developers in search of finding a way to transfer TRC-20 Usdt by the means of scripts. The main purpose is mainly to create a wallet or a payment gateway, exchange, Dex (Decentralized Exchange), and so on. There are 2 libraries that help developers materialize this idea. One of these libraries is written in Python and its name is tronpy. The other one is written in JavaScript and is named Tronweb.The main reason why Sending TRC-20 Usdt is important is the same as asking why Blockchain is essential. The latter answer is because it makes the transactions much faster and decentralized and more independent from central authorities than any other institution in the world. The answer to the former question is just the same as the latter adding the fact that the gas fees on Tron Network are very low Not to mention that the blockchain is trusted worldwide. Moreover, most people count on its security. However, with the events that happened for Terra Network on May 2022, people are more suspicious about most of the blockchains’ network security.
Getting started with Tron Network development:
Like other networks, the Tron network has both mainnet and testnet. The testnet names for the Tron network are “nile” and “shasta”. You can get a number of test TRC-20 Usdt or any other test TRC-20 token including Tron by signing in to your discord account and asking the faucet to give you some of it. We will get that later after we create an account using on Tron network and get our account address and the private key. Before writing any you need to first install the tronpy module:
pip install tronpy
# On Linux use pip3
pip3 install tronpy
Now we are ready to write our very first script.1. Creating a Test Account:
Create a new python file and call it TronAccount.py. Then enter the following Script into it:
from tronpy import Tron, Contract
from tronpy.keys import PrivateKey

client = Tron(network="shasta")
wallet = client.generate_address()
print("Wallet address:  %s" % wallet['base58check_address'])
print("Private Key:  %s" % wallet['private_key'])
The above script will simply connect to the shasta testnet and create a wallet. By using the wallet, it derives the account address and the private key. Now we should run the script:
python3 TronAccount.py
This results in:
Wallet address: TS2AThtoLPTR2bRakWc9nitkKDwDvkPJ6H
Private Key: 464068d2a6bac31aa1eb4db1764647799fad45e80661f311f379a38061397d28
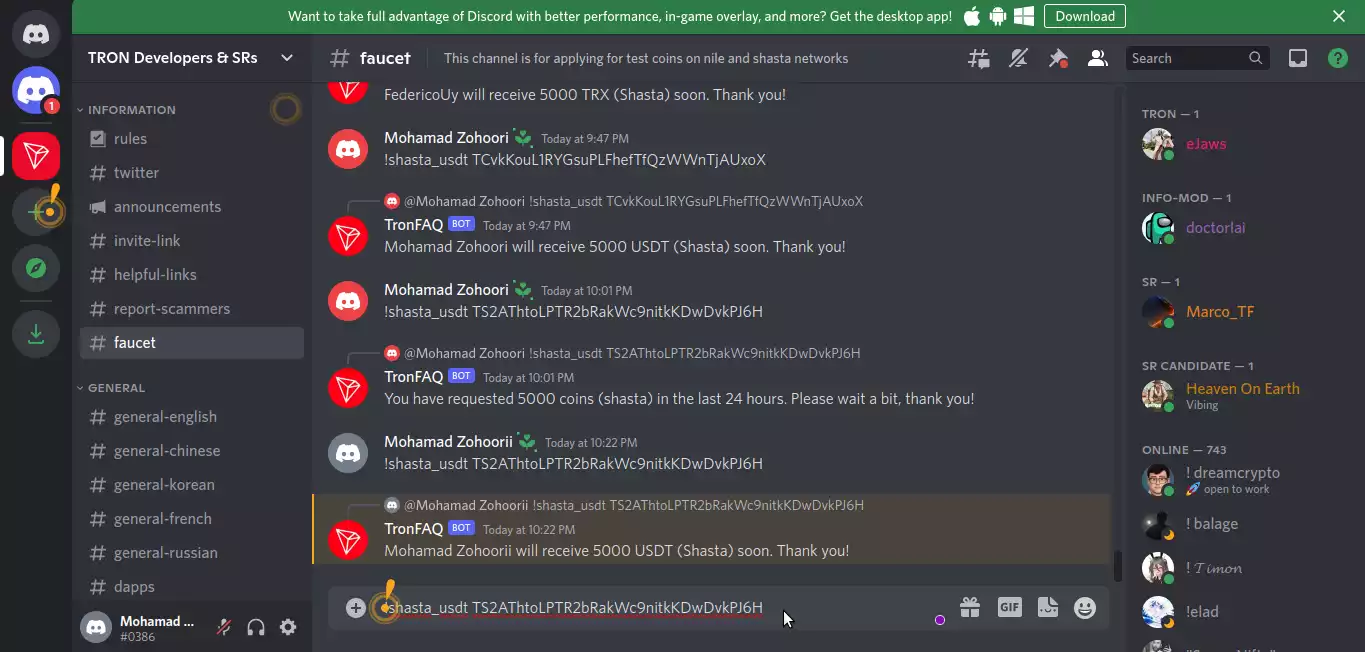
Now that we have our own account and the private key, we can get some test shasta TRC-20 Usdt from the Tron Discord page. To do this, you need to ask for it in the faucets section by commenting:
!shasta_usdt "Your_Account_Address"
Notice that you will need to place the account address that you have got in the account address section in the above comment. The below photo will guide you toward this step:
!shasta "Your_Account_Address"
Notice that the transfer of the test tokens from the faucet may not be immediately performed and you might need to wait for even hours to get it. Especially if you have asked for the test tokens twice. To make sure you have got the tokens, you will need to check your balance.2. Checking the balance of the account for TRC-20 Usdt:
to check the balance of the account you can simply use the following script. Notice that if you haven’t had any transactions on the account, or haven’t received any token from any other account, your account is not activated, yet. After getting activated. When your account is not activated you will face the Error saying that the account is not found on-chain.
from tronpy import Tron

client = Tron(network="shasta")
balance = client.get_account_balance(str('TS2AThtoLPTR2bRakWc9nitkKDwDvkPJ6H'))
print (balance)
In the above code we have once more connected to the shasta testnet and this time we have checked the balance of the account. After making sure you have got some test usdt, it is time to create another account to transfer our test TRC-20 Usdt tokens into it. To do so, you can use the first piece of code we wrote for creating our first account. Keep the account addresses and the private key for the next step which is transferring the tokens from one account to the other.3. Transferring TRC-20 Usdt Test tokens:
After all, we have got to the exciting part of this tutorial. We are going to transfer TRC-20 Usdt from one account to the other. To write the code, we need to install the Tronweb JavaScript module first. The following two commands using npm and yarn will both help install the package:
npm install tronweb
# Using yarn
yarn add tronweb
Now, create a JavaScript file called transfer.js and also a package.json to contain the “type”: “module”, part.
"type": "module"
The general form of transfer.js should be like the following script. Notice that you should enter your specifications in it.
import TronWeb from 'tronweb';

const tronWeb = new TronWeb({
    fullHost: "trongrid address according to the preferred testnet or mainnet",
    headers: { "TRON-PRO-API-KEY": AppKey },
    privateKey: "The Sender's Private Key",
});

const options = {
    feeLimit: 10000000,
    callValue: 0
};

const tx = await tronWeb.transactionBuilder.triggerSmartContract(
    "TRC-20 Contract Address according to network you use", 'transfer(address,uint256)', options,
    [{
      type: 'address',
      value: "Account Address of the Receiver"
    }, {
      type: 'uint256',
      value: (Amount) * 1000000
    }],
    tronWeb.address.toHex("Account Address of the sender")
);

const signedTx = await tronWeb.trx.sign(tx.transaction);
const broadcastTx = await tronWeb.trx.sendRawTransaction(signedTx);

console.log(signedTx);
console.log(broadcastTx);
For our case, the code becomes just the same as below.
import TronWeb from 'tronweb';

const tronWeb = new TronWeb({
    fullHost: "https://api.shasta.trongrid.io",
    //headers: { "TRON-PRO-API-KEY": AppKey },
    privateKey: "464068d2a6bac31aa1eb4db1764647799fad45e80661f311f379a38061397d28",
});

const options = {
    feeLimit: 10000000,
    callValue: 0
};

const tx = await tronWeb.transactionBuilder.triggerSmartContract(
    "TG3XXyExBkPp9nzdajDZsozEu4BkaSJozs", 'transfer(address,uint256)', options,
    [{
      type: 'address',
      value: "TS1KhsETNqnmGgJMsWUGGzsbRpWRYkcAdD"
    }, {
      type: 'uint256',
      value: 5 * 1000000
    }],
    tronWeb.address.toHex("TS2AThtoLPTR2bRakWc9nitkKDwDvkPJ6H")
);

const signedTx = await tronWeb.trx.sign(tx.transaction);
const broadcastTx = await tronWeb.trx.sendRawTransaction(signedTx);

console.log(signedTx);
console.log(broadcastTx);
We have replaced the shasta full host address and commented the API key as we do not need it for the testnet. We have also entered the private key of the sender and the public keys of the receiver and the sender. The other thing we have specified is the amount that we want to transfer. And most important, we have placed the TRC-20 usdt shasta testnet contract address. Note that for the usdt the contract address differs based on which network it is on. Generally, you can use the following three contract addresses based on your preferred network:
Shasta Testnet: TG3XXyExBkPp9nzdajDZsozEu4BkaSJozs
Nile Testnet: TXYZopYRdj2D9XRtbG411XZZ3kM5VkAeBf
Mainnet: TR7NHqjeKQxGTCi8q8ZY4pL8otSzgjLj6t
And for the testnet addresses, you can use the followings.
Shasta Testnet:  https://api.shasta.trongrid.io
Nile Testnet: https://api.nileex.io/
Now it is time to finally run our code and see the result of the transaction. If the sender’s account is not activated, there will be no transferring but at least will see the result of a successful transaction. to run the JavaScript code, you can simply run the following.
node transfer.js
As a result you will see.
{
visible: false,
txID: 'd50f206ed3609a6e766a969d4c97c4f3b3d1b423e15422f18bc4dfd5c20ffd5b',
raw_data: {
contract: [ [Object] ],
ref_block_bytes: 'ae30',
ref_block_hash: '9c128228851ac4a2',
expiration: 1662581406000,
fee_limit: 10000000,
timestamp: 1662581347555
},
raw_data_hex:'0a0...long number...',
signature: [
'c7fb...long number...'
]
}
{
code: 'CONTRACT_VALIDATE_ERROR',
txid: 'd50f206ed3609a6e766a969d4c97c4f3b3d1b423e15422f18bc4dfd5c20ffd5b',
message: '436f...long number...'
}
The above is the result of printing the result of a signed and broadcasted transaction.Conclusion
In this tutorial-based article, you learned how to create an account on the Tron Shasta testnet to get some test TRC20 Usdt from the shasta testnet faucet. Also, you learned how to check the balance of an account, and in the end, you learned how to transfer the test Usdt tokens on the shasta testnet. In the next article, you will learn about more Tron Blockchain interactions and useful projects that can help you create your cool projects.Download this Article in PDF format

Arashtad Custom Services
In Arashtad, we have gathered a professional team of developers who are working in fields such as 3D websites, 3D games, metaverses, and other types of WebGL and 3D applications as well as blockchain development.


