How to Install and Use Brownie to Deploy A Smart Contract
In this article, we are going to install and use Brownie as a much simpler tool to deploy Solidity smart contracts using python scripts. Throughout this tutorial, we will install Brownie, create a Brownie project folder and deploy the simple storage smart contract. You will see that the whole process is done much easier and faster with Brownie rather than python web3.py scripts.
Install and Use Brownie to Deploy A Smart Contract
We have learned how to deploy our smart contracts using python web3 tools, but if you look at the scripts you will see that we have taken a very long way to get there. However, there is an easier and more efficient way to deploy our contracts in python and that is Brownie. Brownie is the most common smart contract development platform built based on python. It is used by DeFi giants like Curve DAO, Yearn Finance, and Badger DAO. Brownie relies on web3.py. That’s why we started our first python tutorials with web3.
Install Brownie
To install Brownie, we need to first install pipx. Pipx will automatically create a virtual environment and after install Brownie using it, makes it available on the terminal. To install pipx on your terminal, use:
python3 -m pip install --user pipx
And on Linux, you should also install the following:
apt install python3.8-venv
And then:
python3 -m pipx ensurepath
And now, we can install Brownie:
pipx install eth-brownie
And, upgrade it:
pipx upgrade eth-brownie
Creating a Brownie project:
If you want to make sure that Brownie has been successfully installed open another terminal and type:
brownie –version
Now, that Brownie has been installed, let’s create our first project using it:
mkdir brownie_simple_storage
And then to create our files automatically:
brownie init
And you will be able to see that a number of files have been created afterward.
Build File:
Keeps track of low-level stuff like the .json file of the contract, deployments, and interfaces.
Contracts File:
Where we write our contract.
Interfaces File:
Where we store our interface tools to make it easier to work with the blockchain And other folders which we talk about later. So, inside our contracts folder, we make a file called SimpleStorage.sol:
cd contracts
touch SimpleStorage.sol
And copy and paste the recent SimpleStorage contract that we wrote on Solidity tutorials.
// SPDX-License-Identifier: MIT

pragma solidity >= 0.6.0 < 0.9.0;

contract SimpleStorage {

    uint256 Salary;
    struct Employees {
	uint256 Salary;
	string name;
    }

    Employees[] public employee;
    mapping(string => uint256) public nameToSalary;

    function store(uint256 _Salary) public {
	Salary = _Salary;
    }

    function retrieve() public view returns (uint256){
	return Salary;
    }

    function addPerson(string memory _name, uint256 _Salary) public {
	employee.push(Employees(_Salary, _name));
	nameToSalary[_name] = _Salary;
    }
}
now if you go back to the main folder and type:
brownie compile
You will see that the project has been easily compiled without the need of any scripts. And also if you go to build/contracts , you will be able to see the .json file with the name of the contract SimpleStorage.json. And if you can remember from the previous tutorials, the .json file of the contract contains data like ABI, bytecode, opcode, and so on.
Deploying the Contract Using Brownie
Now, it is time to deploy this contract using Brownie. So to do that we go to the scripts folder and create a file called deploy.py. And before we start writing our scripts, let’s review our python code on web3. We needed ABI and bytecode which Brownie has automatically provided out of our smart contract, we also needed RPC URI that we copied from either Ganache or Infura. The Brownie here uses Ganache-cli and you need to make sure you have it installed if you want to deploy your contracts. The following code should be written in deploy.py.
from brownie import accounts

def deploy_simple_storage():
    account = accounts[0]
    print (account)

def main():
    print("Hello World!")
And it is run by typing:
brownie run /scripts/deploy.py
In the terminal, we will see that we are given an account address with its private key.
There is also another way to have an account on Brownie and that is to use our Metamask wallet.
To do that, in the terminal we write:
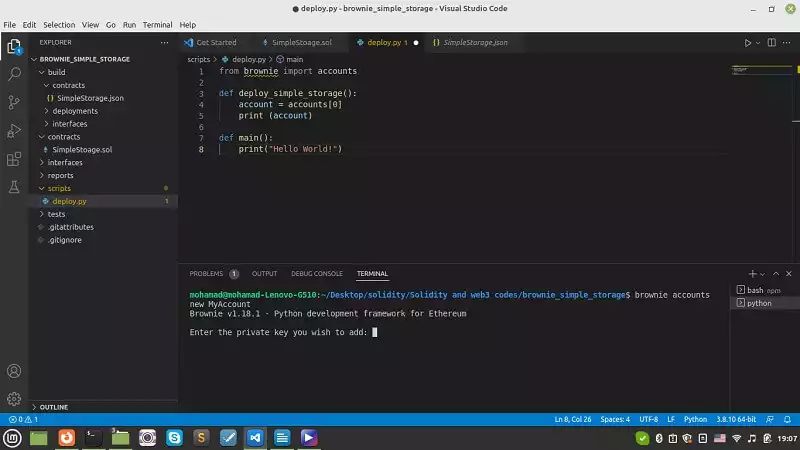
brownie accounts new MyAccount
And you will see that the terminal asks you to enter your private key:
Now, you can copy and paste your account private key to introduce it to Brownie and be able to use it afterward. Then, you enter a password:
SUCCESS: A new account '0x25E681EE76469E4cF846567b772e94e082907117' has been generated with the id 'MyAccount'
You will see the above result on the terminal. And it tells you that you can use the ‘MyAccount’ id instead of writing your private key.
You can write in console:
brownie accounts list
Result:
Found 1 account:
└─MyAccount: 0x25E681EE76469E4cF846567b772e94e082907117
And, if you want to retrieve your private key in the future, we write in our deploy.py:
from brownie import accounts

def deploy_simple_storage():
    account = accounts.load("MyAccount")
    print(account)

def main():
    print("Hello World!")
After running this code by writing:
brownie run /scripts/deploy.py
We will see that the terminal asks us about our password So that we can finally access our private key. Notice that this a safer way than using a .env file, but still using environment variables is a safe way to protect your private key.
We can also delete our account using this command:
brownie accounts delete MyAccount
Result:
SUCCESS: Account 'MyAccount' has been deleted
Last Thought
So, up to now, we have learned about some of the good features and capabilities of Brownie and we have managed to deploy our smart contract much easier than with python web3 tools, this time using Brownie. However, managing the installed Brownie to deploy a Simple Storage contract is the least we can do. So, We’re going to cover the next stages in our next articles.
Download this Article in PDF format

Check Out Our Services
In Arashtad, we’re working on 3D games, metaverses, and other types of WebGL and 3D applications with our 3D web development team. However, our services are not limited to these. Back-end developments, front-end developments, 3d modeling, and animations are in our arsenal too.


