Using Brownie to Switch between Different Networks
In this article, we are going to switch between the different available networks we can connect to, using Brownie. Then, we’ll write a statement in the Deploy.py to connect to the network requested in the terminal by the user (the developer). This kind of script for network management makes it easy for us to connect to any network that we want at any time it is required for testing and other purposes.
How to Switch between Networks
As you know, we have different networks to work with. We have already used some of them for deploying our contracts. Sometimes we need to write our deploy.py file in a way that we can switch between different networks and accounts and the deploy.py must understand which ones are available.
Switch between Different Networks
Before we get started with this task, we can check the keywords when we want to connect to different accounts. To look up the keyword related to any network, we write:
brownie networks list
Result:
Brownie v1.18.1 - Python development framework for EthereumThe following networks are declared:Ethereum
├─Mainnet (Infura): mainnet
├─Ropsten (Infura): ropsten
├─Rinkeby (Infura): rinkeby
├─Goerli (Infura): goerli
└─Kovan (Infura): kovanEthereum Classic
├─Mainnet: etc
└─Kotti: kottiArbitrum
└─Mainnet: arbitrum-mainAvalanche
├─Mainnet: avax-main
└─Testnet: avax-testAurora
├─Mainnet: aurora-main
└─Testnet: aurora-testBinance Smart Chain
├─Testnet: bsc-test
└─Mainnet: bsc-mainFantom Opera
├─Testnet: ftm-test
└─Mainnet: ftm-mainHarmony
└─Mainnet (Shard 0): harmony-mainMoonbeam
└─Mainnet: moonbeam-mainOptimistic Ethereum
├─Mainnet: optimism-main
└─Kovan: optimism-testPolygon
├─Mainnet (Infura): polygon-main
└─Mumbai Testnet (Infura): polygon-testXDai
├─Mainnet: xdai-main
└─Testnet: xdai-testDevelopment
├─Ganache-CLI: development
├─Geth Dev: geth-dev
├─Hardhat: hardhat
├─Hardhat (Mainnet Fork): hardhat-fork
├─Ganache-CLI (Mainnet Fork): mainnet-fork
├─Ganache-CLI (BSC-Mainnet Fork): bsc-main-fork
├─Ganache-CLI (FTM-Mainnet Fork): ftm-main-fork
├─Ganache-CLI (Polygon-Mainnet Fork): polygon-main-fork
├─Ganache-CLI (XDai-Mainnet Fork): xdai-main-fork
├─Ganache-CLI (Avax-Mainnet Fork): avax-main-fork
└─Ganache-CLI (Aurora-Mainnet Fork): aurora-main-fork
As you can remember, we have used Rinkeby from Infura a number of times and here the keyword for Rinkeby (Infura) is Rinkeby. Here, when we work with Brownie, in order to define the Infura RPC URL on the .env file, we need to write it in a different format:
export WEB3_INFURA_PROJECT_ID=80ca094b614b44b3b647ceb01a2b70d0
Notice that if you write any word other than WEB3_INFURA_PROJECT_ID, you will have a problem working with the Rinkeby or other networks of Infura because Brownie has some built-in scripts that read from the ID with only this name.
Swtich Between Networks via Network Management in Deploy.py
The next thing we should do when we want to check for networks available for deployment is to add the following function to our deploy.py file:
def get_account():
	if network.show_active() == "development":
		return accounts[0]
	else:
		return accounts.add(config["wallets"]["from_key"])
And whenever we want to define our account, we write:
Account = get_account()
It is also necessary to import the network from Brownie:
From Brownie import network
The above code checks whether we want to use our Ganache CLI test accounts or use any other accounts that we have defined its a private key to our .env file and introduced to Brownie.
In order to connect to Rinkeby account in our Metamask wallet (that we entered its private key in the .env file), and the Rinkeby test network, in the terminal we should type:
brownie run scripts/deploy.py --network rinkeby
Result:
Brownie v1.18.1 - Python development framework for EthereumBrownieSimpleStorageProject is the active project.Running 'scripts/deploy.py::main'...
Transaction sent: 0xbfe6fb9f152eeda4fc880fc5a5cb6f74b0d73b440ada91e8bef71fb7fccf1ccd
Gas price: 1.000000012 gwei Gas limit: 367598 Nonce: 48
SimpleStorage.constructor confirmed Block: 10426128 Gas used: 334180 (90.91%)
SimpleStorage deployed at: 0x1570258Ee66a921A3f5fdEA48f5ba54bE657AA8b0
Transaction sent: 0x0a5d8886732d99e6045eede0958894a033e48225d6818c312491b178195576ed
Gas price: 1.000000012 gwei Gas limit: 47842 Nonce: 49
SimpleStorage.store confirmed Block: 10426129 Gas used: 43493 (90.91%)SimpleStorage.store confirmed Block: 10426129 Gas used: 43493 (90.91%)38
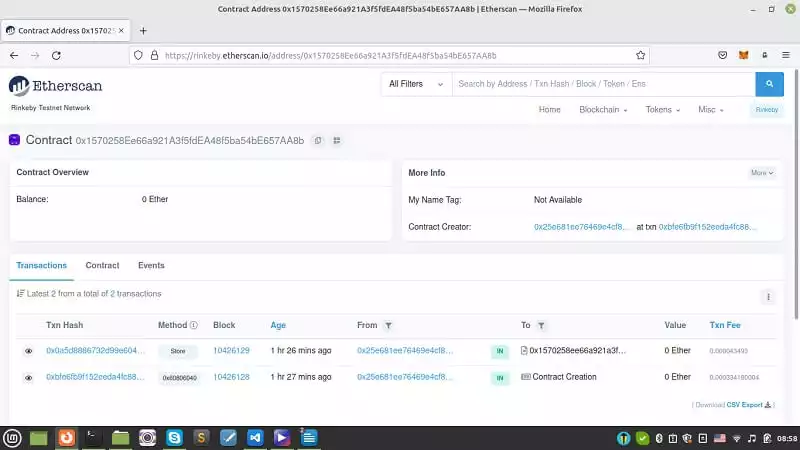
And you can see the transaction related to contract deployment and storing a value inside the contract has been successfully completed on the Rinkeby network. Because we are working with Rinkeby, the transaction is trackable on this link. To be able to track it, simply copy and paste the address of the transaction into the search bar of the Etherscan.
Reading from the Contracts
One of the useful and necessary steps in writing an application related to a smart contract is being able to read from the transaction. The following steps will help you retrieve the different properties of the deployed smart contracts.
First, create a file in the scripts folder and name it read_value.py. Then, write the following code in it.
from brownie import SimpleStorage, accounts, config

def read_contract():
	print(SimpleStorage)

def main():
	read_contract()
The above code, reads the contract deployments and their transactions. Let’s see the result by typing in the terminal:
brownie run scripts/read_value.py --network rinkeby
Result:
Brownie v1.18.1 - Python development framework for EthereumBrownieSimpleStorageProject is the active project.Running 'scripts/read_value.py::main'...
The above result shows an array inside which we can retrieve the first member by changing the code to:
from brownie import SimpleStorage, accounts, config

def read_contract():
	print(SimpleStorage[0])

def main():
	read_contract()
brownie run scripts/read_value.py --network rinkeby
Result:
Brownie v1.18.1 - Python development framework for EthereumBrownieSimpleStorageProject is the active project.Running 'scripts/read_value.py::main'...
0x1570258Ee66a921A3f5fdEA48f5ba54bE657AA8b
If you take a closer look, you will see that the address given here, is just the same address that we saw on Etherscan (the address of the contract deployment). It is worth knowing that if you want to retrieve the latest address contract that has been deployed, instead of print (SimpleStorage[0]), you can write print (SimpleStorage[-1]).
Notice that Brownie already knows the address and the ABI of our smart contract because it has saved it in a .json file. Also, if we want to retrieve a number again without asking the blockchain for it, we can retrieve it in the read_value.py file by writing:
print(SimpleStorage[-1].retrieve()
Result:
38
Summing Up
In this article, we have managed to write a script that makes it easy to switch between different networks such as Testnet (like Rinkeby), Mainnet, and local (like Ganache CLI) for the users and the developers. With this script written in the deploy.py, we can choose the network at the time of running Brownie by simply calling the network’s name in the terminal.
Download this Article in PDF format

Check Out Our Services
In Arashtad, we’re working on 3D games, metaverses, and other types of WebGL and 3D applications with our 3D web development team. However, our services are not limited to these. Back-end developments, front-end developments, 3d modeling, and animations are in our arsenal too.


