How to Design A Wearable in Blender: A Step by Step Guide
Designing and manufacturing custom-made wearables, splints and casts is one of the hottest topics of the day. To design a custom-made wearable object in Blender, considering that they shouldn’t have any sharp edges in addition to having small and large lattice structures on their shell, makes the design a bit complicated. However, using some useful scripts in Python and the guides that we give you throughout this tutorial, you are going to finally learn how to design different kinds of wearables.
Design A Wearable in Blender
Writing the Utility Functions to Design A Wearable in Blender
The below utility functions will help us a lot in simplifying the execution of the design and the readability of our scripts. Many of the functions written in the following are explained throughout the article.
import  bpy
import bmesh
import math
import os
import sys

####################################################################
#####                Utility Functions
####################################################################

class BOOLEAN_TYPE:
        UNION = 'UNION'
        DIFFERENCE = 'DIFFERENCE'
        INTERSECT = 'INTERSECT'
Boolean Function
The above function will apply the boolean operation on the object specified according to the type of boolean categorized in the classBOOLEAN_TYPE:The difference, Union, and Intersect.
def make_boolean(obj1, obj2, boolean_type):
        if not obj1 or not obj2:
                return

        modifier = obj1.modifiers.new(name='booly', type='BOOLEAN')
        modifier.object = obj2
        modifier.operation = boolean_type

        res = bpy.ops.object.modifier_apply({"object": obj1}, apply_as='DATA', modifier=modifier.name)
        assert "FINISHED" in res, "Error"
Fixing the Non-Manifold Meshes
Using the function below, we can fix the object with open meshes or what we know as non-manifold objects. At first, we remesh the object to a voxel-based mesh object. Then, we check if the object has any non-manifold meshes or not. If it has we will remove the non-manifold meshes. And finally will smooth the object and meshes of it one more time.
def fixMesh(obj_name):
        make_voxel_remesh(get_object_by_name(obj_name), 0.5)
        if is_object_have_non_manifolds(get_object_by_name(obj_name)):
                print(obj_name, "have non manifolds")
                if remove_object_non_manifold_loops(obj_name, loops=2):
                        print("Filled:", fill_non_manifolds(obj_name))
                        obj = get_object_by_name(obj_name)
                        make_smooth_remesh(obj, 9, 0.9, 1, True, True)
The functions below, which are used above, will check if the object has any non-manifold meshes or not, remove the non-manifold loops and also fill the non-manifold meshes.
def is_object_have_non_manifolds(obj):
        assert obj.type == 'MESH', "Unsupported object type"

        bmo = bmesh.new()
        bmo.from_mesh(obj.data)

        have = False
        for edge in bmo.edges:
                if not edge.is_manifold:
                        have = True
                        break

        if not have:
                for vert in bmo.verts:
                        if not vert.is_manifold:
                                have = True
                                break

        bmo.free()  # free and prevent further access
        return have

def is_object_contain_selected_vertices(obj):
        if obj.mode == "EDIT":
                bm = bmesh.from_edit_mesh(obj.data)
        else:
                bm = bmesh.new()
                bm.from_mesh(obj.data)

        selected = False
        for v in bm.verts:
                if v.select:
                        selected = True
                        break
        bm.free()
        return selected


def remove_object_non_manifold_loops(obj_name, loops=0):
        deselect_objects()
        select_object_by_name(obj_name)
        activate_object_by_name(obj_name)

        removed = False
        bpy.ops.object.mode_set(mode='EDIT')
        bpy.ops.mesh.select_mode(type="VERT")
        bpy.ops.mesh.select_non_manifold(extend=False)
        if is_object_contain_selected_vertices(get_object_by_name(obj_name)):
                if loops:
                        for i in range(loops):
                                bpy.ops.mesh.select_more()
                        bpy.ops.mesh.delete(type='FACE')
                else:
                        bpy.ops.mesh.delete(type='VERT')
                removed = True
        bpy.ops.mesh.select_all(action='DESELECT')
        bpy.ops.object.mode_set(mode='OBJECT')
        return removed

def fill_non_manifolds(obj_name):
        deselect_objects()
        select_object_by_name(obj_name)
        # activate_object_by_name(obj_name)

        filled = False
        bpy.ops.object.mode_set(mode='EDIT')
        bpy.ops.mesh.select_mode(type="VERT")
        bpy.ops.mesh.select_non_manifold(extend=False)
        if is_object_contain_selected_vertices(get_object_by_name(obj_name)):
                bpy.ops.mesh.fill(use_beauty=True)
                bpy.ops.mesh.normals_make_consistent(inside=False)
                bpy.ops.mesh.faces_shade_smooth()
                filled = True
        bpy.ops.mesh.select_all(action='DESELECT')
        bpy.ops.object.mode_set(mode='OBJECT')
        return filled
Object Selection and Deleting to Design a Wearable in Blender
The functions below are useful when dealing with the list of items and actions like selecting, deselecting, deleting, activating the object or getting it by name.
def delete_object(objName):
        bpy.ops.object.select_all(action='DESELECT')
        bpy.data.objects[objName].select_set(True) # Blender 2.8x
        bpy.ops.object.delete()

def deselect_objects():
        bpy.ops.object.select_all(action='DESELECT')

def select_object_by_name(obj_name):
        get_object_by_name(obj_name).select_set(True) # Blender 2.8x

def activate_object_by_name(obj_name):
        bpy.context.view_layer.objects.active = get_object_by_name(obj_name)

def get_object_by_name(obj_name):
        assert obj_name in bpy.data.objects, "Error getting object by name:	{}".format(obj_name)
        obj = bpy.data.objects[obj_name]
        return obj
Remesh Function
The first remesh function will convert the meshes from triangular to voxel-based and the second one will remesh the object by smoothing it.
def make_voxel_remesh(obj, voxel_size, adaptivity=0, use_smooth_shade=True):
        modifier = obj.modifiers.new(name='remesh', type='REMESH')
        modifier.mode = 'VOXEL'
        modifier.voxel_size = voxel_size
        modifier.adaptivity = adaptivity
        modifier.use_smooth_shade = use_smooth_shade
        res = bpy.ops.object.modifier_apply({"object": obj}, apply_as='DATA', modifier=modifier.name)
        assert "FINISHED" in res, "Error"

def make_smooth_remesh(obj, octree_depth=9, scale=0.9, threshold=1, use_smooth_shade=True,
                use_remove_disconnected=True):
        modifier = obj.modifiers.new(name='remesh', type='REMESH')
        modifier.mode = 'SMOOTH'
        modifier.use_smooth_shade = use_smooth_shade
        modifier.octree_depth = octree_depth
        modifier.scale = scale
        modifier.use_remove_disconnected = use_remove_disconnected
        modifier.threshold = threshold

        res = bpy.ops.object.modifier_apply({"object": obj}, apply_as='DATA', modifier=modifier.name)

        assert "FINISHED" in res, "Error"
The above functions work for different kinds of remeshing.Utility Functions to Design A Wearable in Blender
Remember that the scripts we are using here are related to Blender version 2.83 and if you are working with any other versions, it is probable that the scripts might differ a little bit, but we will show you ways to find the proper functions if there are any differences at all.
Functions for Creating the Fillets
The following function will create a proper fillet for a shell with a pattern (for example a circle) and an object that has been cut (with the selected vertices at the cutting curve). We can later join this fillet to the main shell. This kind of lattice is of the additive type not subtractive like most fillets.
def make_Fillet2(ob,pattern):
        bpy.ops.object.editmode_toggle()
        bpy.ops.mesh.duplicate_move()
        bpy.ops.object.editmode_toggle()

        bpy.ops.object.convert(target='CURVE')
        bpy.context.object.data.bevel_object = bpy.data.objects[pattern]
        bpy.ops.object.convert(target='MESH')
        bpy.ops.object.editmode_toggle()
        bpy.ops.mesh.select_all(action='SELECT')
        bpy.ops.mesh.normals_make_consistent(inside=False)
        bpy.ops.object.editmode_toggle()
Using the following function, we will get the thickness of the shell and creates a circular curve pattern for creating the fillet.
def Fillet_pattern(thickness):
        #Fillet pattern based on thickness
        bpy.ops.curve.primitive_bezier_circle_add(radius=thickness/2,
                enter_editmode=False, align='WORLD', location=(0, 0, 0))
        bpy.context.object.data.dimensions = '2D'
        bpy.context.object.data.fill_mode = 'BOTH'
        for obj in bpy.context.selected_objects:
                obj.name = "Fillet"
Function for Creating A Shell Around the Object
With the help of the function below, we can create a shell using the data like the thickness, offset, and the object that we are going to create a shell out of.
def make_solidify(obj, offset, thickness, only_external=False):
        modifier = obj.modifiers.new(name='solidify', type='SOLIDIFY')
        modifier.offset = offset
        modifier.thickness = thickness
        if only_external:
                modifier.use_rim = True  # Fill Rim
                modifier.use_rim_only = True

        res = bpy.ops.object.modifier_apply({"object": obj}, apply_as='DATA', modifier=modifier.name)

        assert "FINISHED" in res, "Error"
Object Translation Functions
Using all the following functions, you can translate an object to a certain point, and get the specified point by the user.
def object_closest_point_mesh(p, obj):

        result, location, normal, face_index = obj.closest_point_on_mesh(p)
        assert result, "Can't find closest point on mesh"
        location = location.to_tuple()
        normal = normal.to_tuple()
        return location + normal  # return tuple of 6 floats

def obj_transform(filename, obj_name, size, location, angle):

        ob = bpy.context.scene.objects[obj_name]       # Get the object
        bpy.ops.object.select_all(action='DESELECT') # Deselect all objects
        bpy.context.view_layer.objects.active = ob   # Make the cube the active object
        ob.select_set(True)

        obj = bpy.data.objects[obj_name]
        obj.location = location

        bpy.ops.transform.rotate(value=angle, orient_axis='Z',
                orient_type='GLOBAL',
                orient_matrix=((1, 0, 0), (0, 1, 0), (0, 0, 1)),
                constraint_axis=(False, False, True))

def object_put_part2(part_name, point, obj, scale, obj_name):
        vx,vy,vz,a,b,c = object_closest_point_mesh(point, obj)
        a1 = math.atan2(b, a)
        obj_transform(part_name, obj_name, scale, (point[0], point[1], point[2]), a1)
The above 3 functions will translate the object to the point given in the def object_put_part2 function.
def get_vertex():
        bm = bmesh.new()
        ob = bpy.context.active_object
        bm = bmesh.from_edit_mesh(ob.data)

        points = []
        for v in bm.verts:
            if (v.select == True):
                obMat = ob.matrix_world
                points.append(obMat @ v.co)

        for p in points:
            pOb = bpy.data.objects.new("VertexPoint", None)
            bpy.context.collection.objects.link(pOb)
            pOb.location = p
        return p
The above function will get the vertex given by the user in the edit mode and store it in a variable.More Dependency Functions
The below dependency functions are mainly for selecting objects and optimized boolean union. The optimized boolean union creates no open or buggy meshes on the object whereas the simple boolean union created non-manifold meshes. Fixing the meshes in another way than mentioned, importing the.stl files, and so on.
def Fix(obj_name):
        if is_object_have_non_manifolds(get_object_by_name(obj_name)):
                print(obj_name, "have non manifolds")
                if remove_object_non_manifold_loops(obj_name, loops=2):
                        print("Filled:", fill_non_manifolds(obj_name))
                        obj = get_object_by_name(obj_name)
The above function independently fixes the mesh.
def make_custom_context(*object_names, base_context=None, mode=None):
        if base_context is not None:
                ctx = base_context
        else:
                ctx = {}
        if mode is not None:
                assert mode in ('OBJECT', 'EDIT'), "Wrong mode used"
                ctx['mode'] = mode
        objs = [get_object_by_name(obj_name) for obj_name in object_names]
        ctx['active_object'] = ctx['object'] = objs[0]
        ctx['selected_editable_objects'] = ctx['selected_objects'] = objs
        ctx['editable_objects'] = ctx['selectable_objects'] = ctx['visible_objects'] = objs
        return ctx

def import_stl(filename, obj_name=None, deselect=True, path=None):
        if path is None:
                filepath = os.path.abspath('%s.stl' % filename)
        else:
                filepath = os.path.join(path, '%s.stl' % filename)

        deselect_objects()
        bpy.ops.import_mesh.stl(filepath=filepath)

        bpy.ops.object.mode_set(mode='OBJECT')
        if deselect:
                for obj in bpy.context.selected_objects:
                        set_mesh_items_selection(obj)

        if obj_name:
                set_selected_object_name(obj_name)
The above function imports the object with the given name and the new name that is going to appear in the list of items.Another Kind of Remeshing
def Remesh_Smooth_Voxel(obj):
        make_smooth_remesh(obj, octree_depth=8)
        make_voxel_remesh(obj, 0.5)  # it is necessary because it normal works with self intersections
        make_smooth_remesh(obj, octree_depth=8)  # to make out smoother
And another function for creating shell with a little different functionality:
def solidify(obj,offset,thickness):
        bpy.ops.object.modifier_add(type='SOLIDIFY')
        bpy.context.object.modifiers["Solidify"].offset = offset
        bpy.context.object.modifiers["Solidify"].thickness = thickness
        bpy.ops.object.modifier_apply(apply_as='DATA', modifier="Solidify")

def set_selected_object_name(obj_name):
        for obj in bpy.context.selected_objects:
                obj.name = obj_name

def set_mesh_items_selection(obj, select=False):
        if obj.type != 'MESH':
                return
        set_mesh_data_selection(obj.data.vertices, select)
        set_mesh_data_selection(obj.data.edges, select)
        set_mesh_data_selection(obj.data.polygons, select)

def set_mesh_data_selection(items, select=False):
        for item in items:
                item.select = select

def makeUnionOpt(*object_names):
        ctx = bpy.context.copy()
        if object_names:
                ctx = make_custom_context(*object_names, base_context=ctx, mode='OBJECT')
        bpy.ops.object.join(ctx)  # mostly the same as export/import combination
Designing the Main Panel to Automate Designing a Wearable in Blender
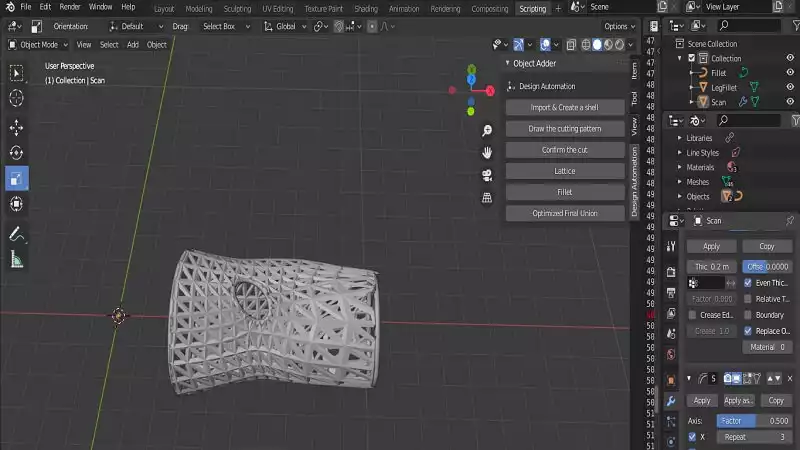
In the previous parts, we wrote the necessary utility functions and now we are ready to create a panel in Blender so that we can automate the process of 3D designing the custom-made wearables.So we continue our script by designing the main panel containing 6 important buttons. 1 class is going to be defined for the main panel and 6 classes for the 6 buttons.
####################################################################
########             Main Panel
####################################################################

class MainPanel(bpy.types.Panel):
        bl_label = "Object Adder"
        bl_idname = "VIEW_PT_MainPanel"
        bl_space_type = 'VIEW_3D'
        bl_region_type = 'UI'
        bl_category = 'Design Automation'

        def draw(self, context):
                layout = self.layout
                layout.scale_y = 1.2

                row = layout.row()
                row.label(text= "Design Automation", icon= 'OBJECT_ORIGIN')
                row = layout.row()
                row.operator("wm_shell.myop", text= "Import & Create a shell")
                row = layout.row()
                row.operator("wm_trim.myop", text= "Draw the cutting pattern")
                row = layout.row()
                row.operator("wm_confirm.myop", text= "Confirm the cut")
                row = layout.row()
                row.operator("wm_lattice.myop", text= "Lattice")
                row = layout.row()
                row.operator("wm_Fillet.myop", text= "Fillet")
                row = layout.row()
                row.operator("wm_union.myop", text= "Optimized Final Union")
In the main panel class, we have determined the structure of the user interface of the panel containing the buttons, the classes they are going to use, and their name on the screen.
####################################################################
####                  Main UI ّFunctions
####################################################################

class WM_Shell_myOp(bpy.types.Operator):
        """Enter the thickness of the Shell"""
        bl_label = "Enter the thickness of the shell"
        bl_idname = "wm_shell.myop"

        def execute(self, context):
                thickness = 0.5
                import_stl("Leg", obj_name="Scan", deselect=True, path='/home/mohamad/Desktop/Blender')
                #change the path to None or to your directory

                obj = get_object_by_name("Scan")
                make_solidify(obj, thickness/2, thickness, only_external=True)

                # Scan Fillet Object
                import_stl("Leg", obj_name="LegFillet", deselect=True,
                        path='/home/mohamad/Desktop/Blender')
                import_stl("Leg", obj_name="Object", deselect=True, path='/home/mohamad/Desktop/Blender')

                obj = get_object_by_name("Object")
                solidify(obj,0,thickness)
                obj2 = get_object_by_name("LegFillet")
                make_boolean(obj2, obj, 'UNION')
                obj = get_object_by_name("LegFillet")
                Remesh_Smooth_Voxel(obj)
                delete_object('Object')

                return {'FINISHED'}
        def invoke(self, context, event):
                return context.window_manager.invoke_props_dialog(self)
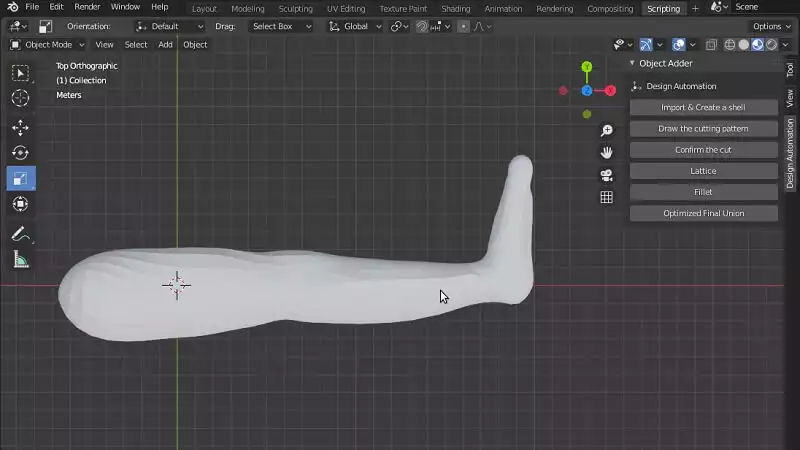
The above class will import the leg.stl scan file and change its name to Scan then it will create a shell out of the leg scan. It also creates an object like the imported leg and will later use for the fillet.
class WM_Trim_myOp(bpy.types.Operator):
        """Draw The trim pattern"""
        bl_label = "Draw The trim pattern"
        bl_idname = "wm_trim.myop"

        def execute(self, context):
                bpy.ops.curve.primitive_nurbs_curve_add(enter_editmode=False,
                        align='WORLD', location=(0,0,0))
                bpy.ops.object.editmode_toggle()
                bpy.context.scene.tool_settings.curve_paint_settings.curve_type = 'BEZIER'
                bpy.ops.curve.delete(type='VERT')

                return {'FINISHED'}

        def invoke(self, context, event):
                return context.window_manager.invoke_props_dialog(self)
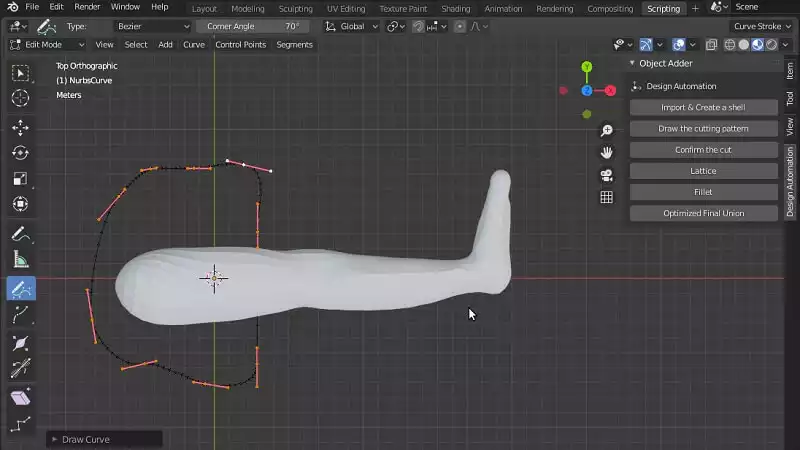
The above class will help the user draw the cutting curve.
class WM_Confirm_myOp(bpy.types.Operator):
        """Click OK to confirm"""
        bl_label = "Click OK to confirm"
        bl_idname = "wm_confirm.myop"

        def execute(self, context):
                name = self.name
                bpy.context.object.data.dimensions = '2D'
                bpy.context.object.data.fill_mode = 'BOTH'
                bpy.context.object.data.extrude = 1000
                bpy.ops.object.editmode_toggle()
                context = bpy.context
                scene = context.scene
                cube = scene.objects.get("NurbsCurve")
                bpy.ops.object.convert(target='MESH')

                bpy.ops.object.editmode_toggle()
                bpy.ops.mesh.select_all(action='SELECT')
                bpy.ops.object.editmode_toggle()

                obj1 = get_object_by_name('Scan')
                obj2 = get_object_by_name('NurbsCurve')
                obj3 = get_object_by_name('LegFillet')

                make_boolean(obj1, obj2, 'DIFFERENCE')
                make_boolean(obj3, obj2, 'DIFFERENCE')
                delete_object("NurbsCurve")

                return {'FINISHED'}
        def invoke(self, context, event):
                return context.window_manager.invoke_props_dialog(self)
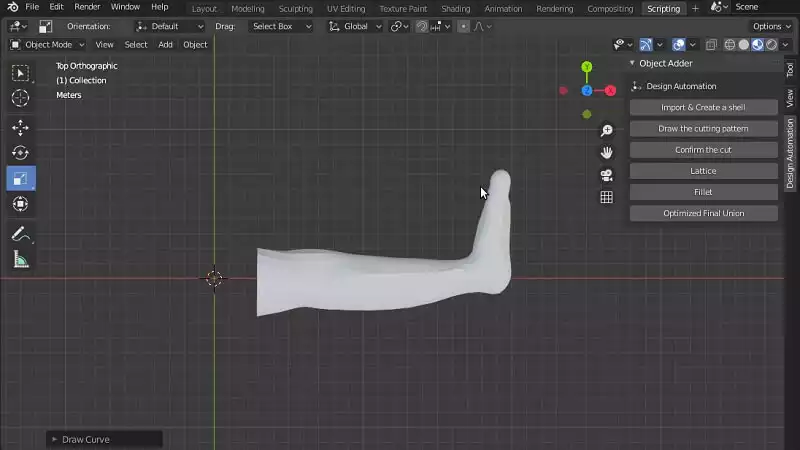
The above class will let the user confirm the drawn cut.
class WM_Lattice_myOp(bpy.types.Operator):
        """In editmode determine the point of lattice"""
        bl_label = "In editmode determine the point of lattice"
        bl_idname = "wm_lattice.myop"

        Lattice_Name = bpy.props.StringProperty(name= "Enter the name of lattice", default= '')

        def execute(self, context):

                Lattice_Name = self.Lattice_Name
                point = get_vertex()
                bpy.ops.object.editmode_toggle()
                obj = get_object_by_name('Scan')
                obj2 = get_object_by_name('%s'%Lattice_Name)
                obj3 = get_object_by_name('LegFillet')
                object_put_part2('%s'%Lattice_Name, point, obj, 1, '%s'%Lattice_Name)
                make_boolean(obj,obj2,'DIFFERENCE')
                make_boolean(obj3,obj2,'DIFFERENCE')

                delete_object("VertexPoint")
                delete_object('%s'%Lattice_Name)

                return {'FINISHED'}
        def invoke(self, context, event):
                return context.window_manager.invoke_props_dialog(self)
The above class will create a lattice based on the point and the object given by the user.
class WM_Fillet_myOp(bpy.types.Operator):
        """Click OK"""
        bl_label = "Click OK"
        bl_idname = "wm_fillet.myop"

        def execute(self, context):

                Fillet_pattern(0.2)
                ob = bpy.context.scene.objects["LegFillet"]       # Get the object
                bpy.ops.object.select_all(action='DESELECT') # Deselect all objects
                bpy.context.view_layer.objects.active = ob   # Make active
                ob.select_set(True)
                make_Fillet2('LegFillet','Fillet')

                return {'FINISHED'}
        def invoke(self, context, event):
                return context.window_manager.invoke_props_dialog(self)
The above class will automatically create a fillet for all the sharp edges.
class WM_Union_myOp(bpy.types.Operator):
        """Click OK"""
        bl_label = "Click OK"
        bl_idname = "wm_union.myop"

        def execute(self, context):
                makeUnionOpt('Scan','LegFillet')
                Fix('Scan')
                return {'FINISHED'}

        def invoke(self, context, event):
                return context.window_manager.invoke_props_dialog(self)
The above class will boolean union the object and its fillet.And we will finally finish our script by registering and unregistering the classes.
####################################################################
#####                     Register and Unregister
####################################################################

def register():
        bpy.utils.register_class(MainPanel)
        bpy.utils.register_class(WM_Shell_myOp)
        bpy.utils.register_class(WM_Trim_myOp)
        bpy.utils.register_class(WM_Confirm_myOp)
        bpy.utils.register_class(WM_Lattice_myOp)
        bpy.utils.register_class(WM_Fillet_myOp)
        bpy.utils.register_class(WM_Union_myOp)

def unregister():
        bpy.utils.unregister_class(MainPanel)
        bpy.utils.unregister_class(WM_Shell_myOp)
        bpy.utils.unregister_class(WM_Trim_myOp)
        bpy.utils.unregister_class(WM_Confirm_myOp)
        bpy.utils.unregister_class(WM_Lattice_myOp)
        bpy.utils.unregister_class(WM_Fillet_myOp)
        bpy.utils.unregister_class(WM_Union_myOp)

if __name__ == "__main__":
        register()
Testing the Panel For Designing A Wearable Properly in Blender
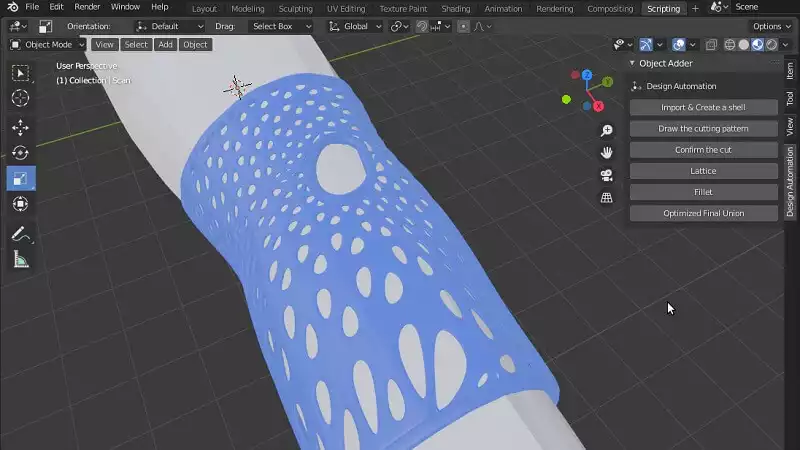
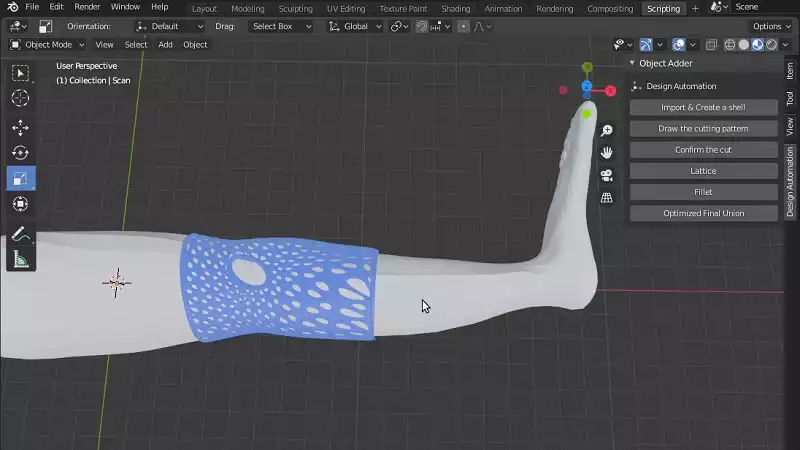
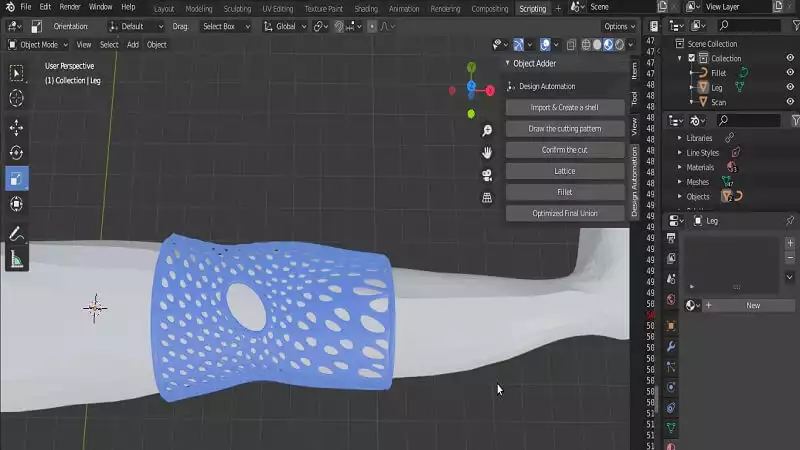
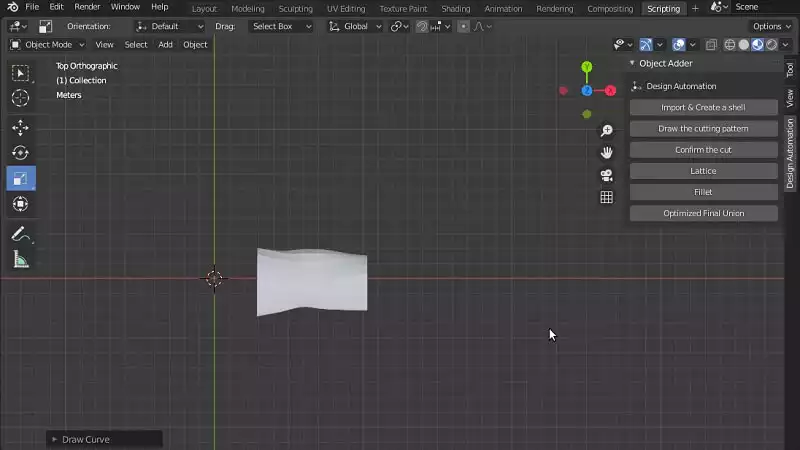
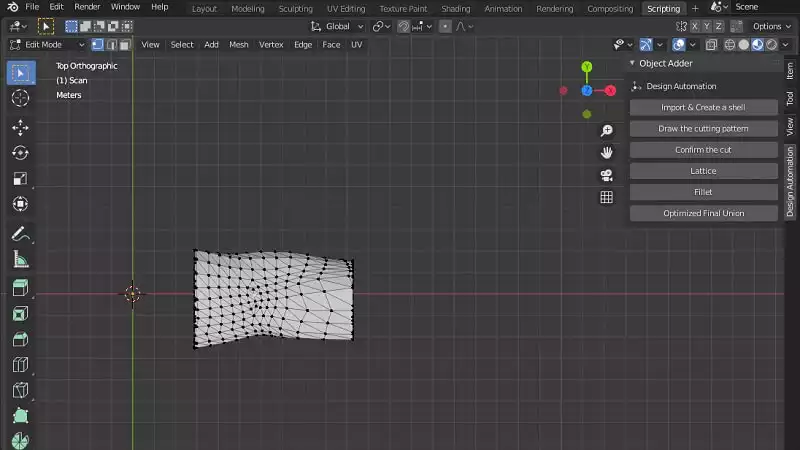
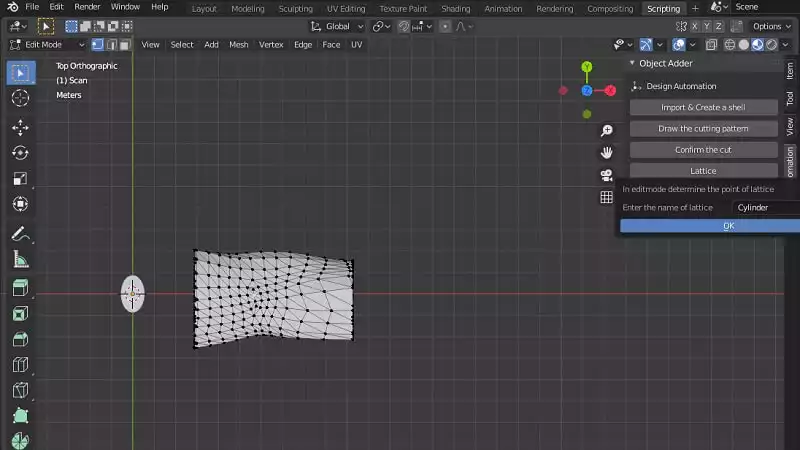
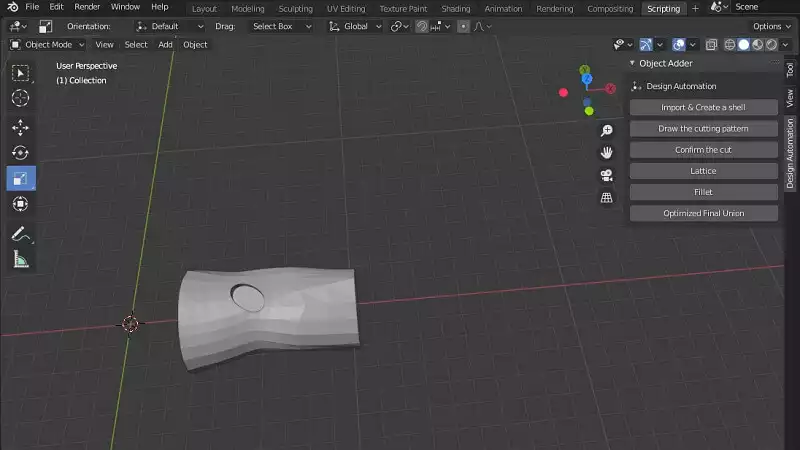
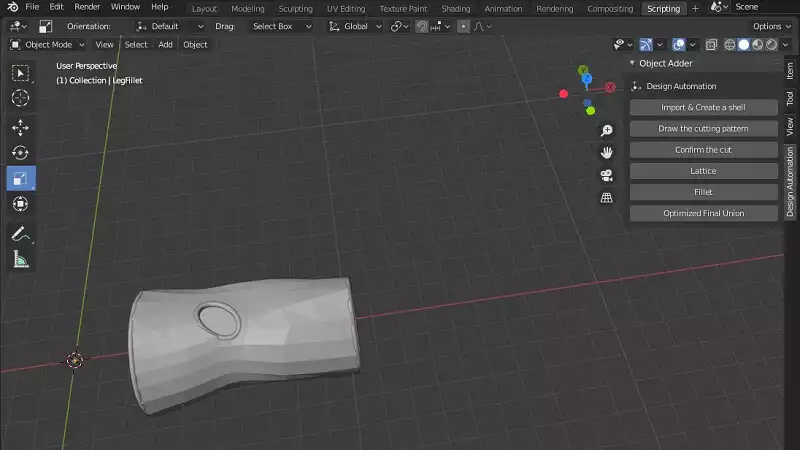
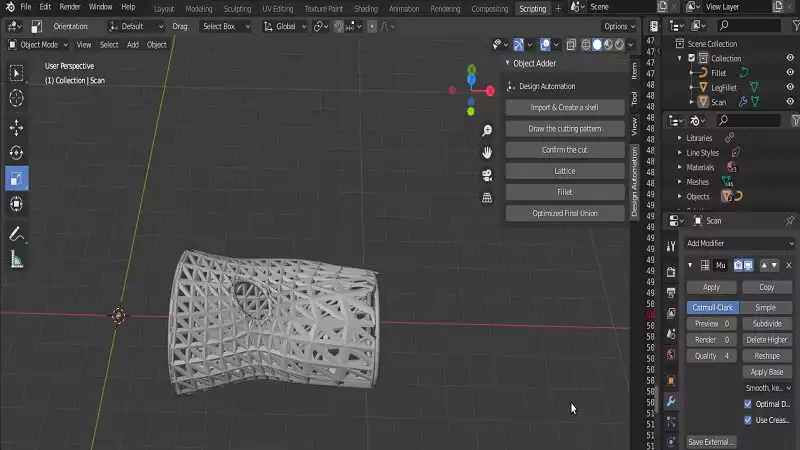
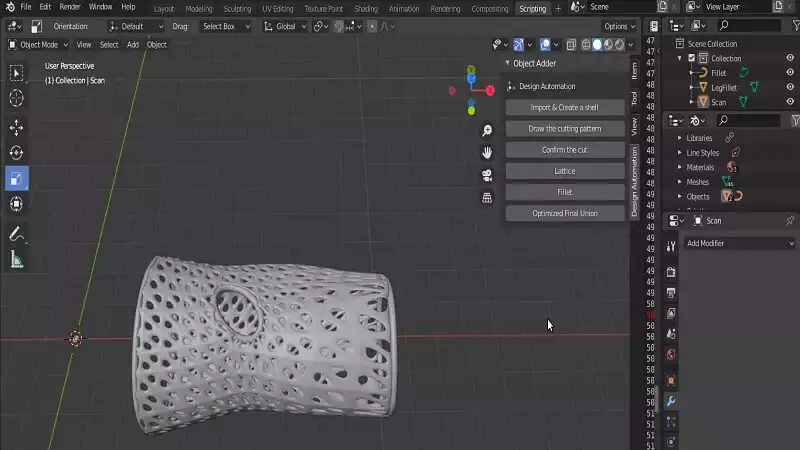
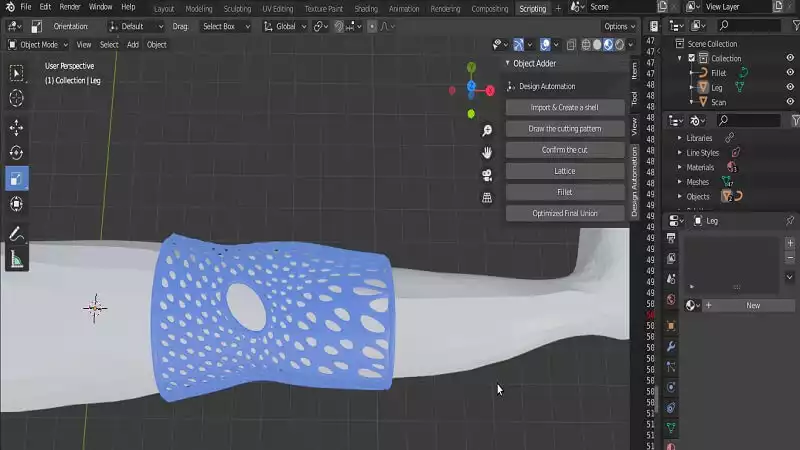
After writing all the scripts, it is now time to test the panel we have created for our wearable design automation in Blender. First of all, clickImport and create a shell.Draw the curve to be able to draw the cutting curve with the pencil tool on the left-hand side of the Blender UI.Confirm the cut to apply the trimming tool.Lattice, enter the name of the lattice in the box, and then click OK. Notice that this is the larger lattice and it is mainly used for placing a sensor or a necessary medical item.Fillet and OK buttons to get all the fillets created.modifiers >> Wireframes and after that smooth modifier.Summing Up
In this tutorial, we have managed to create a panel for designing a wearable, splint or cast for the 3D scan of a limb. At first, we have defined some utility functions to organize and simplify the execution of the steps of the design in Blender Python. Afterward, we have used the functions to create simple steps for the user to be able to quickly design their wearables with the aid of only six buttons or six simple steps. In the end, we have taught the steps of designing a wearable using the designed panel.Download this Article in PDF format

Check Out Our Services
In Arashtad, we’re working on 3D games, metaverses, and other types of WebGL and 3D applications with our 3D web development team. However, our services are not limited to these.
Arashtad Services
Drop us a message and tell us about your ideas.
Tell Us What You Need
3D Development


